Adding refresh token to Strapi v.3
Strapi is an awesome tool allowing you to create simple APIs and at the same time it allows for easy management through their CMS’like interface, when admins want to make some content updates or provide support.

One thing that Strapi yet has to do better is a more long-lived authentication experience when you want to allow users and visitor to log in to your front-end and do management that way through. I have found several videos on how to refresh an existing jwt token, but still there are a few security issues with that, as once the jwt has been issued, and the token can be used to renew itself, there is no way for a user to prevent a token-thief from forever getting access to their account. Actually — at that point not even changing your password will make a difference.
So I sat down and built my extension on the users-permission plugin in Strapi to allow for a better refresh token experience, and thought it might be useful for more developers out there looking to implement same system. Now — please note that this would involve a little bit of coding experience, and you should be aware that we will overwrite Strapi code. Just keep that in mind if you plan on updating Strapi later. Hopefully with the version 4 release of Strapi in the near future and their awesome new Plugin API, we will be able to add this logic in a more elegant way, but we’ll have to see once the public beta is released.
TL;DR
It is a rather long article, but if you sort of know what you are doing, and just want to get it working, you can find the gist here.
Let’s begin
If you haven’t yet set up your Strapi environment, we would need to do that first. If you already have Strapi running on your machine, you can skip this step.
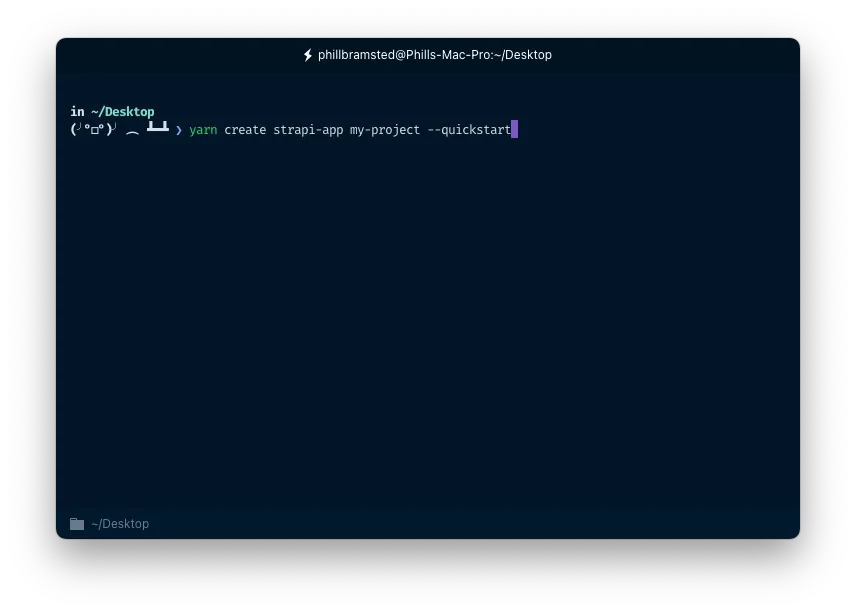
yarn create strapi-app my-project --quickstartNow — I just run the quickstart for the purpose of demonstration, but feel free to go through the customising experience without the --quickstart flag.
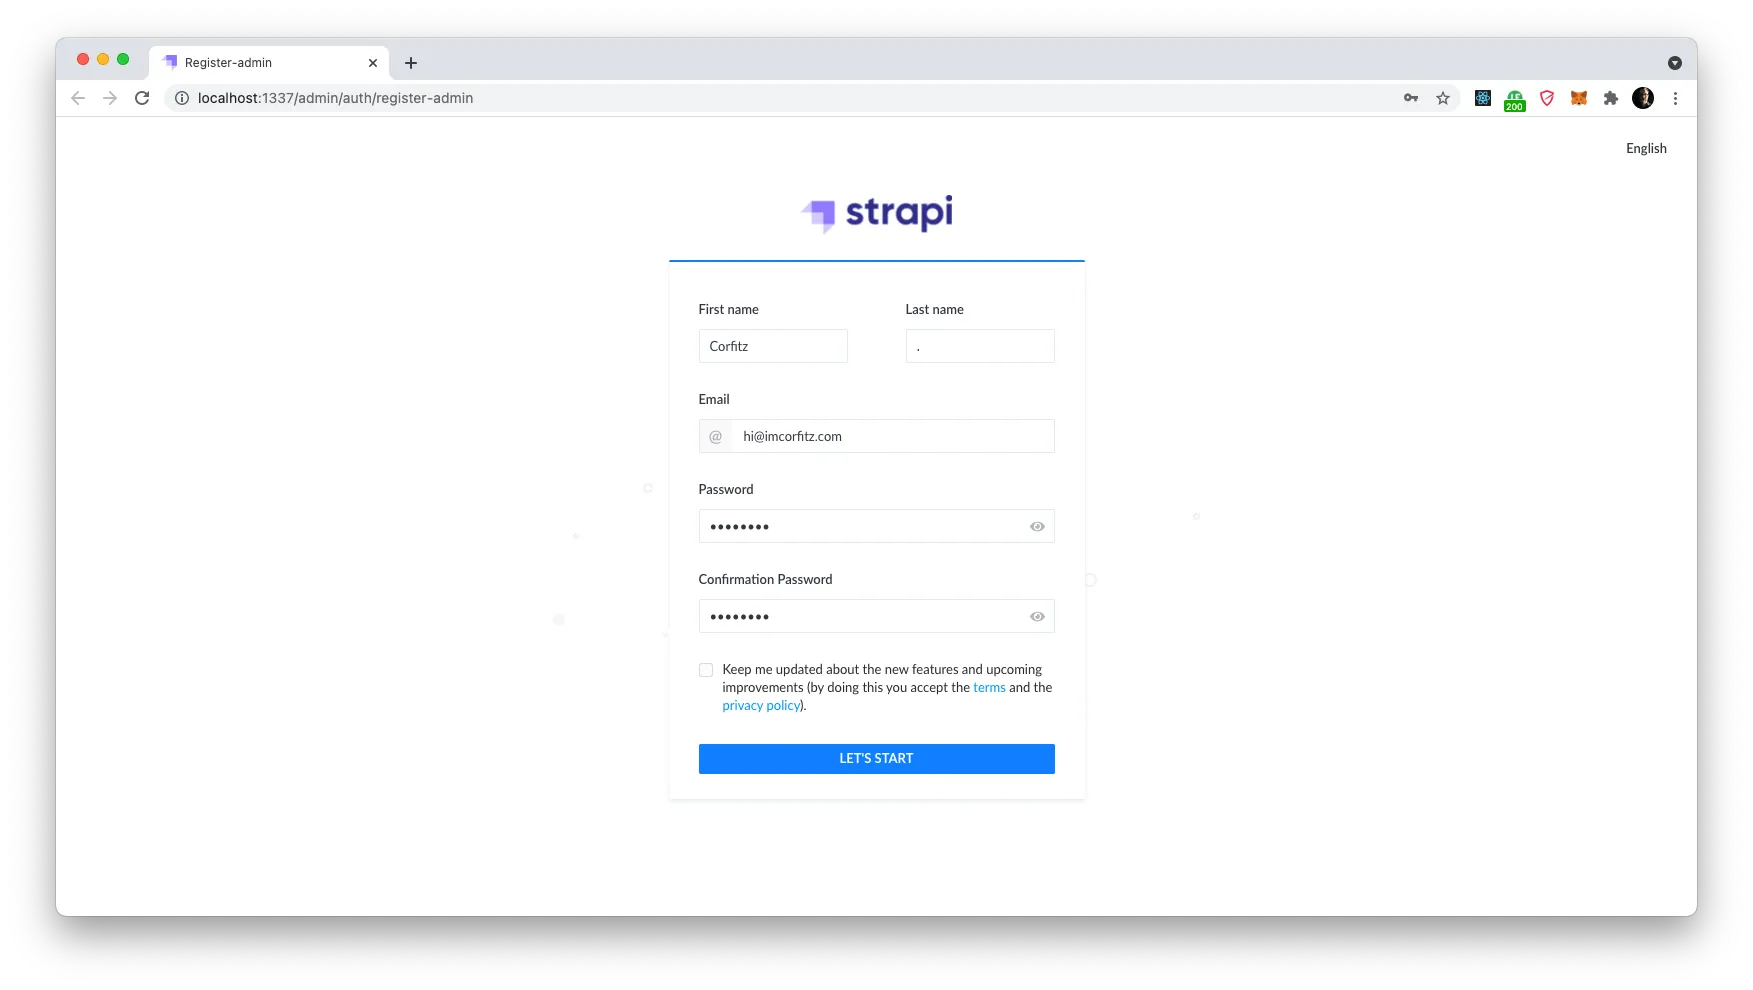
After the installation, we open up Strapi in the browser on http://localhost:1337/admin and begin creating our first admin user.
Now we are ready to start implementing our custom refresh token function. Firstly we want to add a custom field to the User collection type. You will see later on why we will need this.
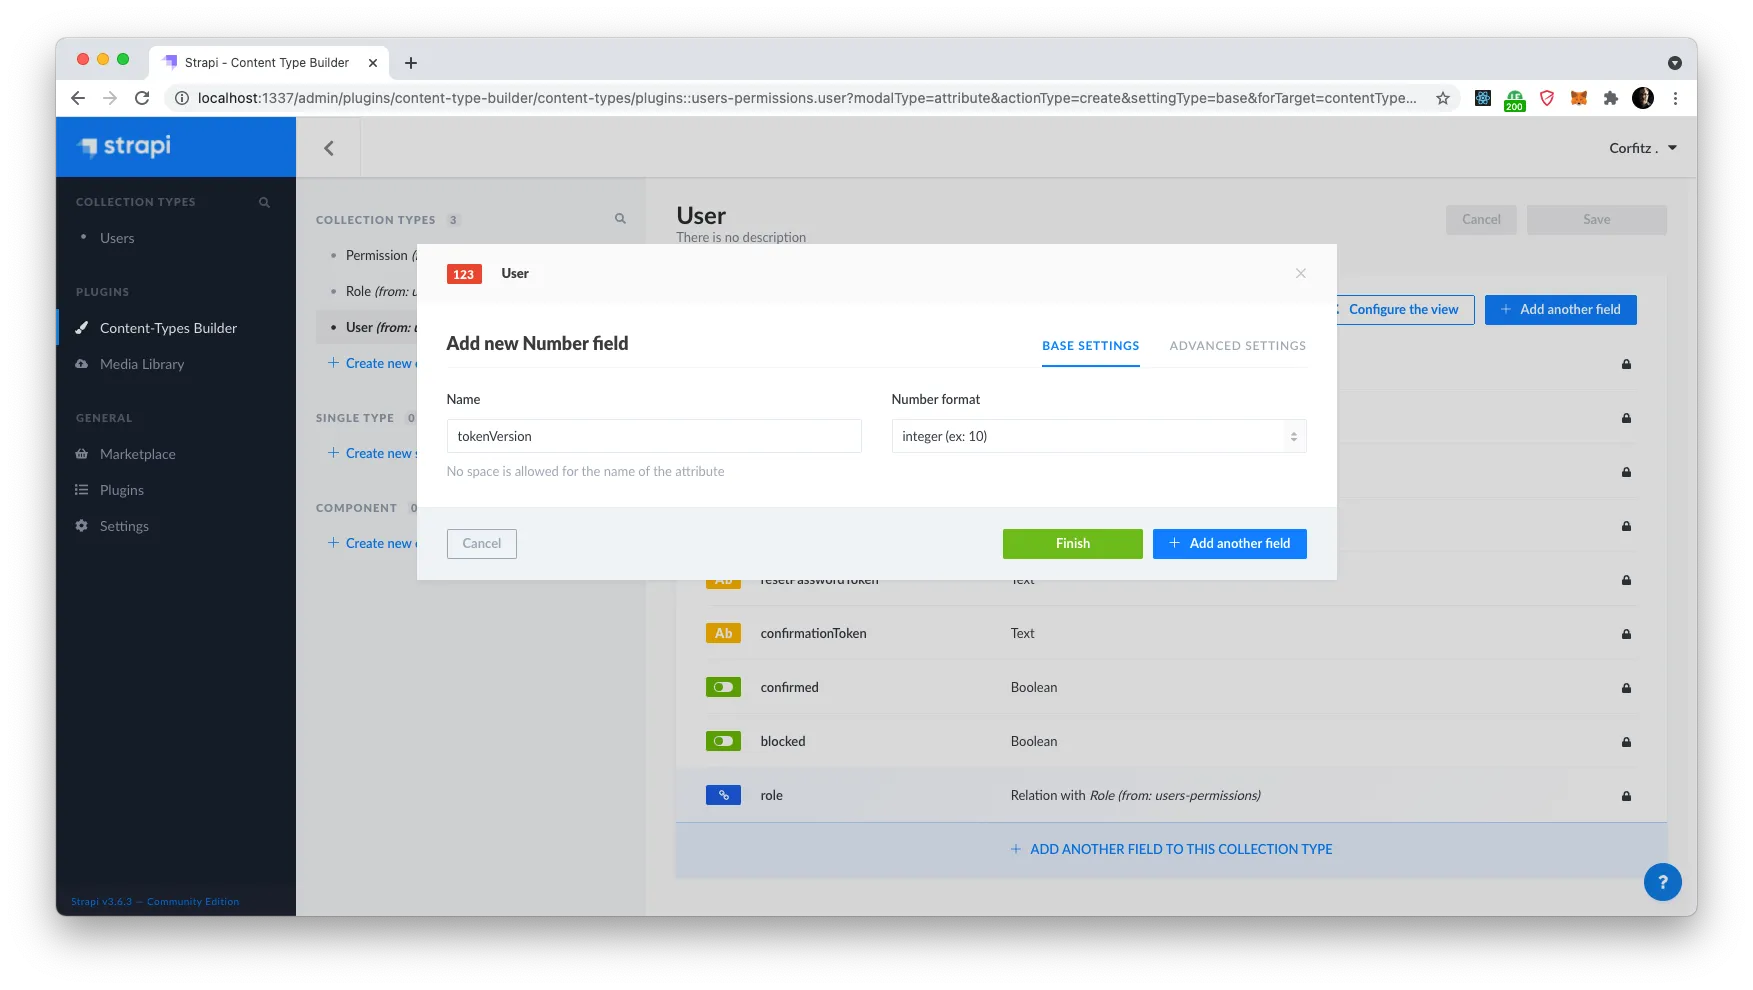
Go to Content-Types Builder and select User under Collection Types. User is a preconfigured plugin in Strapi to manage users and permissions on an API level. In the bottom of the list of fields, click “Add another field to this collection type”.
Select “Number” as field type, and call it tokenVersion. Select integer as Number format.
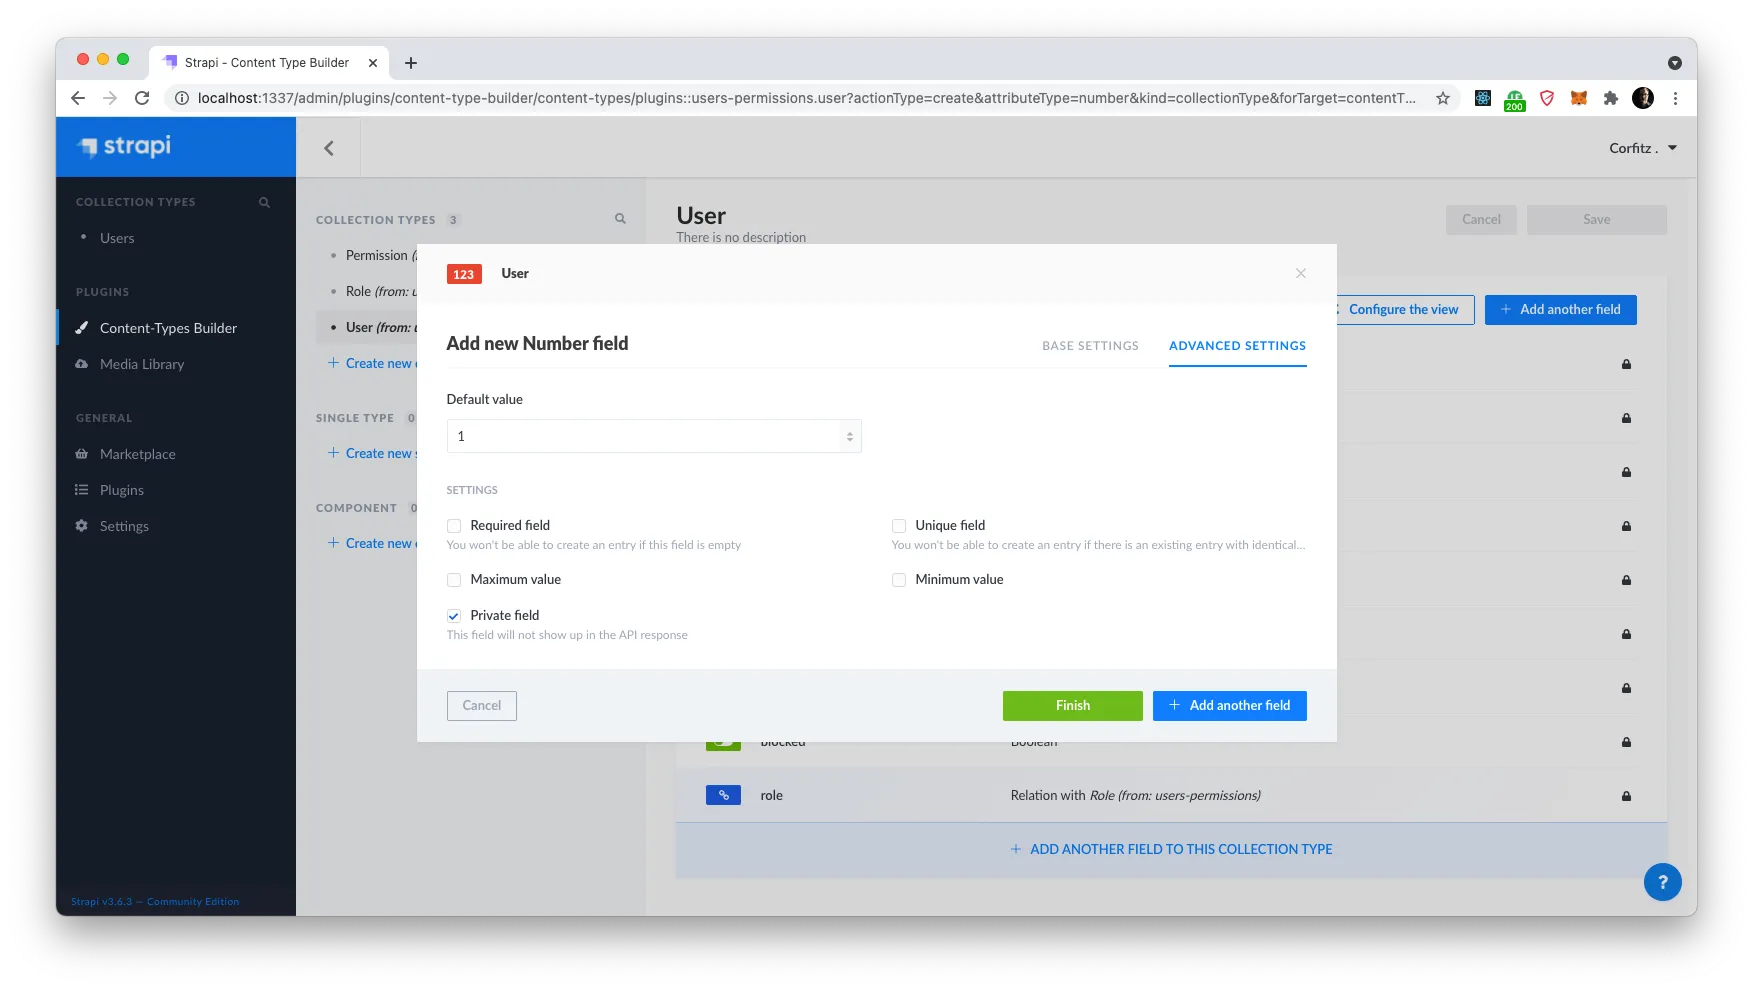
Click on the “Advanced Settings” tab and set the default value to 1 and check the checkbox for Private field, as we do not need this to be exposed to the API.
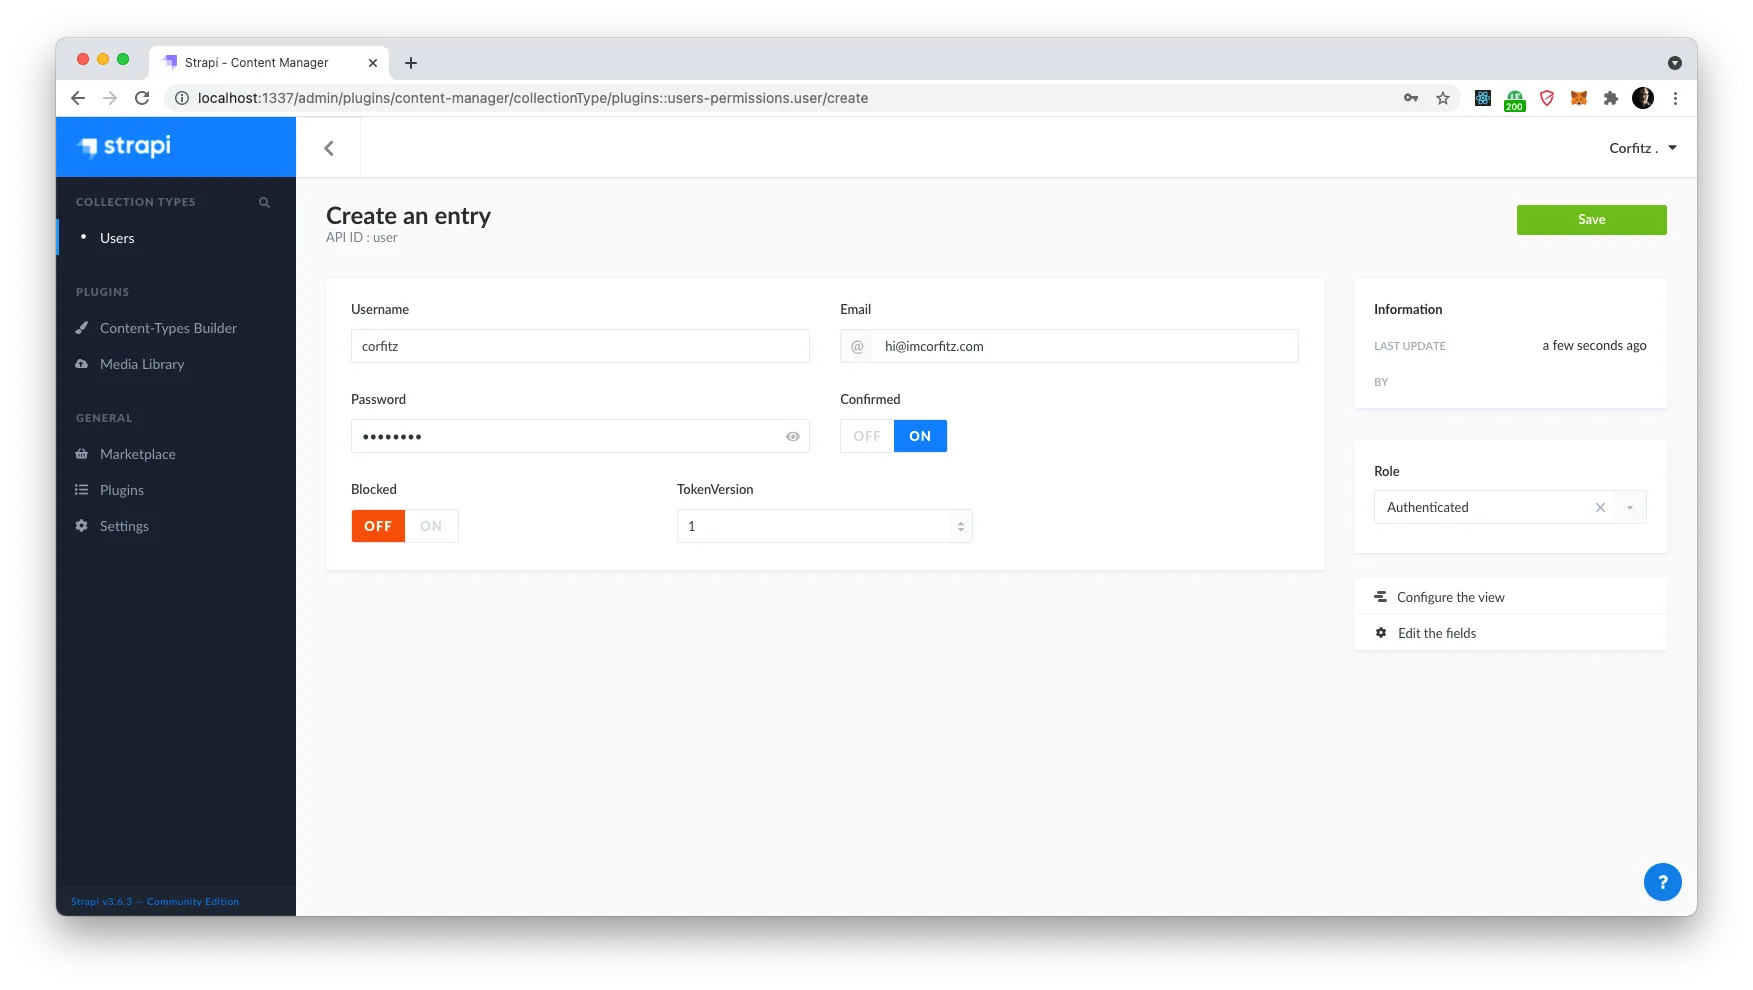
Next let’s add a user in our app. Click ‘Users’ in the left menu under Collection Types and click on “Add new Users”. Fill out all the fields, mark it as confirmed and select ‘Authenticated’ as Role. This is default for users that can engage with your app.
You will notice that our TokenVersion is shown as well — but you can leave this as 1 for now. Click Save and let’s continue with next step in our API client.
There are several great tools out there to help you test and work with your APIs. Postman is a great tool and free to use for most use cases. If you are using VS Code as your IDE, you can also find great extensions to help you explore APIs and save to your workspace for later use. Thunder Client is one of those I enjoy using most, though in most cases I use a paid piece of software called Paw. I really enjoy the work experience, and when you work with bigger APIs, maybe both REST and GraphQL and across multiple environments for production and tests, it just can’t get much better IMO.
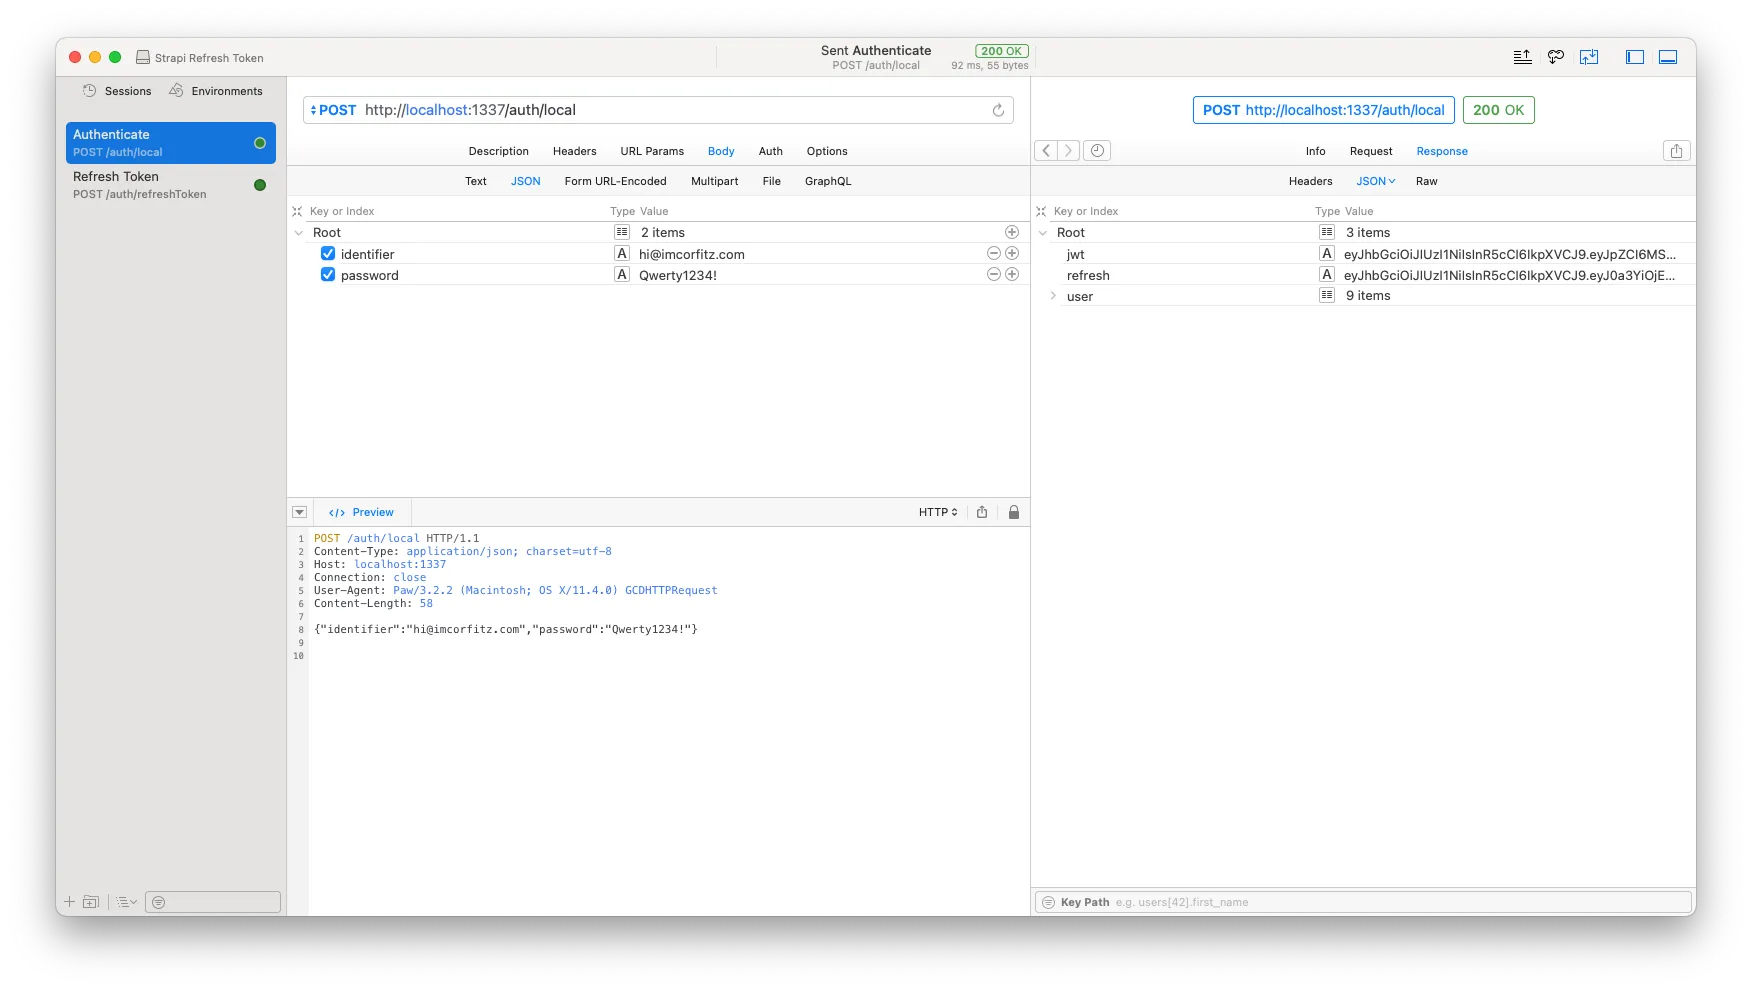
Regardless of your chosen API client, let’s proceed and make an authentication request to our Strapi API. We do so by making a POST request to http://localhost:1337/auth/local posting a JSON object with two values: ‘identifier’ and ‘password’.
{
  "identifier": "hi@imcorfitz.com",
  "password": "Qwerty1234!"
}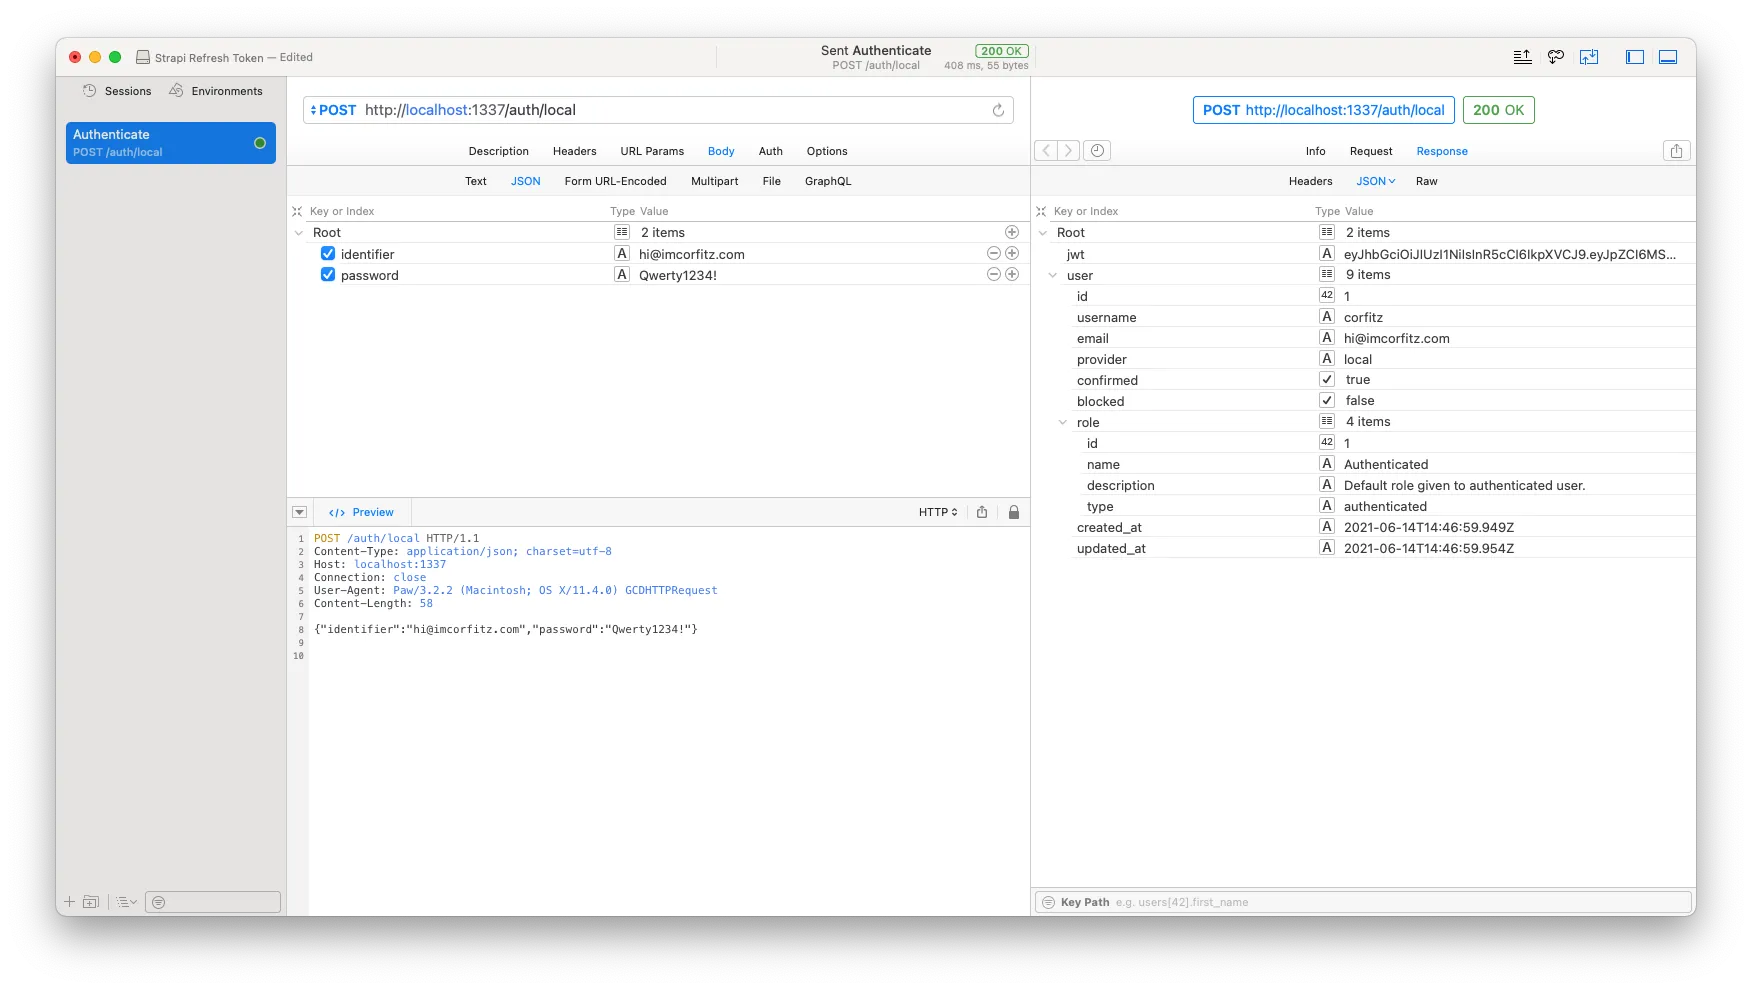
Wunderbar! Everything is working as expected. We have received a JWT (JSON Web Token) and a user object with some further information about the user that has been authenticated.
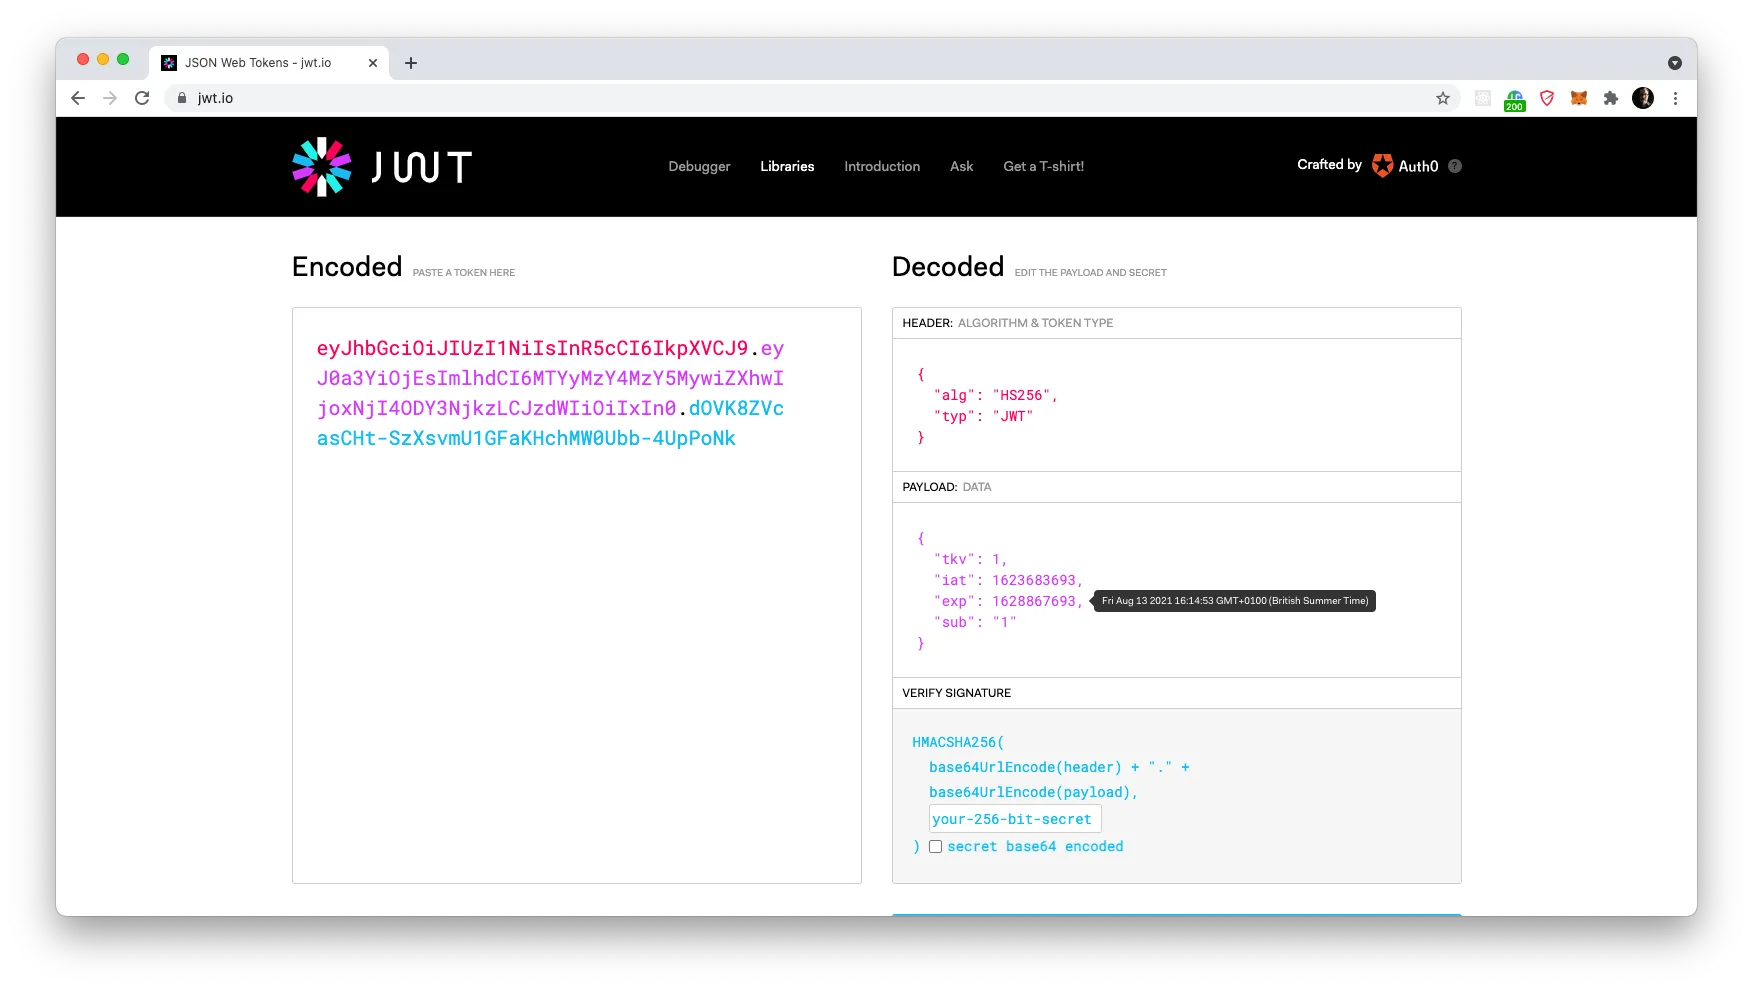
Now — let’s check out what we have in the token. If you open up a new tab in your browser and go to jwt.io you’ll find a space where you can paste in your token. On the right hand side, it will then show you details about the token including the payload, which we want to check in this case.
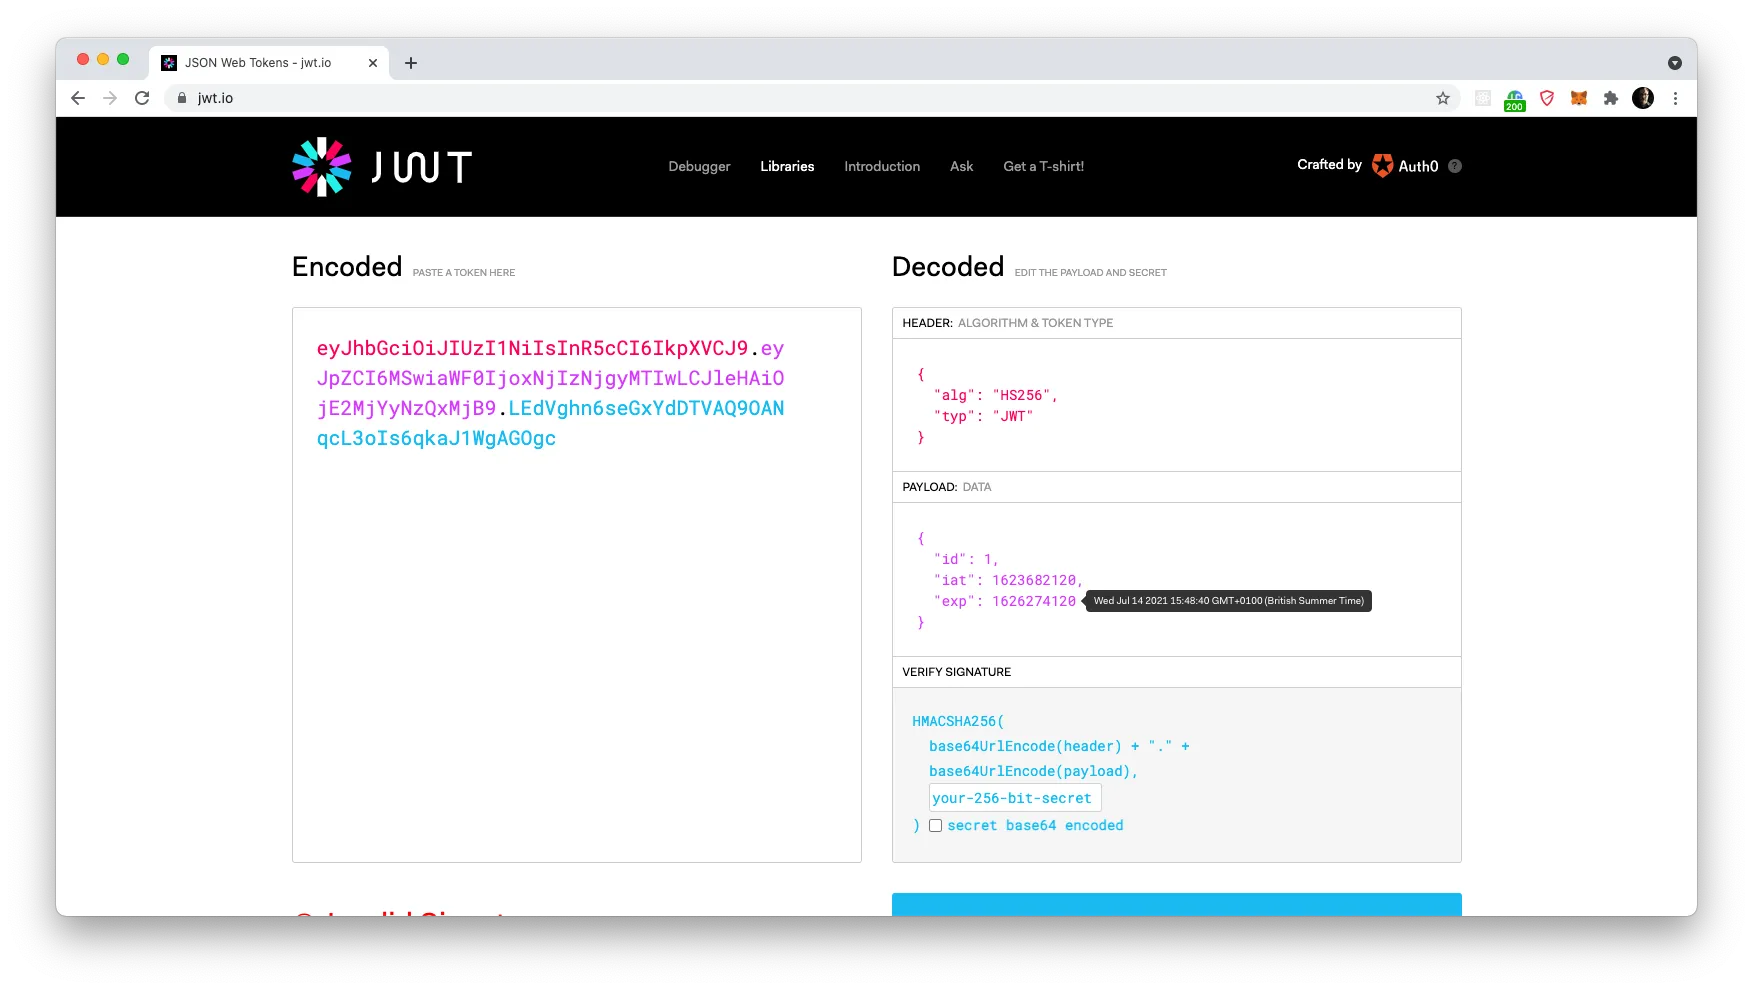
The payload consists of three properties: id which includes the user ID of the authenticated user, iat which includes the timestamp for when this token was “issued at”, and exp which tells us the expiration date for this token. As you can see, we have about 1 month lifetime in one token, which in most cases are sufficient, but in theory, the token could run out at this very day and cause an unfortunate user experience, should they be submitting a 4-page long multistep form and suddenly no longer be allowed access to the API.
That is why we want a refresh token, so we can request a new access token from the server and keep the site accessible and API active while using our app. Everything up to this point should seem fairly familiar to most of you, if you’ve worked with Strapi previously. In next step, we want to make some preparation for our refresh token experience.
Adding new Routes
We want to create two new endpoints to Strapi: refreshToken and revoke. Refresh Token will be called by your app whenever it notices the current access token has expired. Our endpoint here will accept two properties to be submitted:
- token | string | The refresh token to use to generate new tokens
- renew | boolean | If ‘true’ we also return a new refresh token
The revoke endpoint will be called in case a refresh token has been compromised. We are ending up in the same loop, if the one carrying the refresh token can continue to request new access and refresh tokens, so we want a way to invalidate it. This is where we will make use of our Token Version property that we added to our User model.
The revoke endpoint should then only require the refresh token which to invalidate:
- token | string | The token to revoke
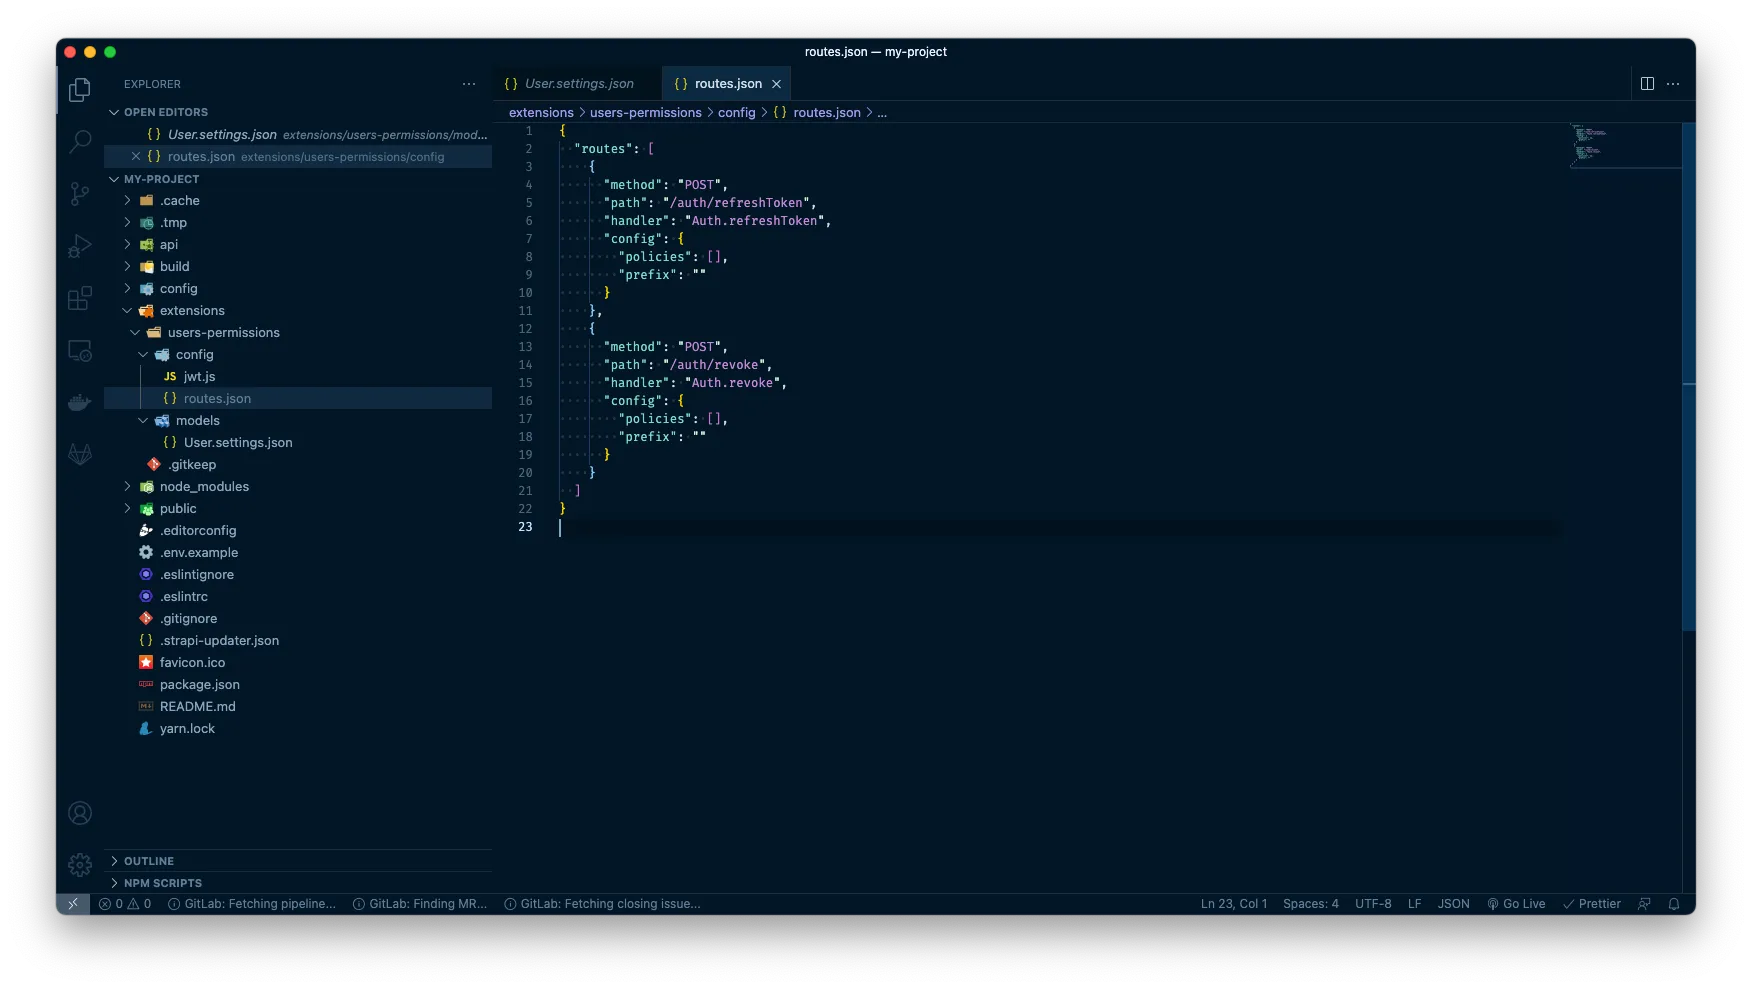
Next step then is to fire up our favourite IDE (in my case VS Code) and then we want to browse to this directory: extensions > users-permissions > config. In this folder, we want to add a new file called routes.json and add following code:
{
  "routes": [
    {
      "method": "POST",
      "path": "/auth/refreshToken",
      "handler": "Auth.refreshToken",
      "config": {
        "policies": [],
        "prefix": ""
      }
    },
    {
      "method": "POST",
      "path": "/auth/revoke",
      "handler": "Auth.revoke",
      "config": {
        "policies": [],
        "prefix": ""
      }
    }
  ]
}
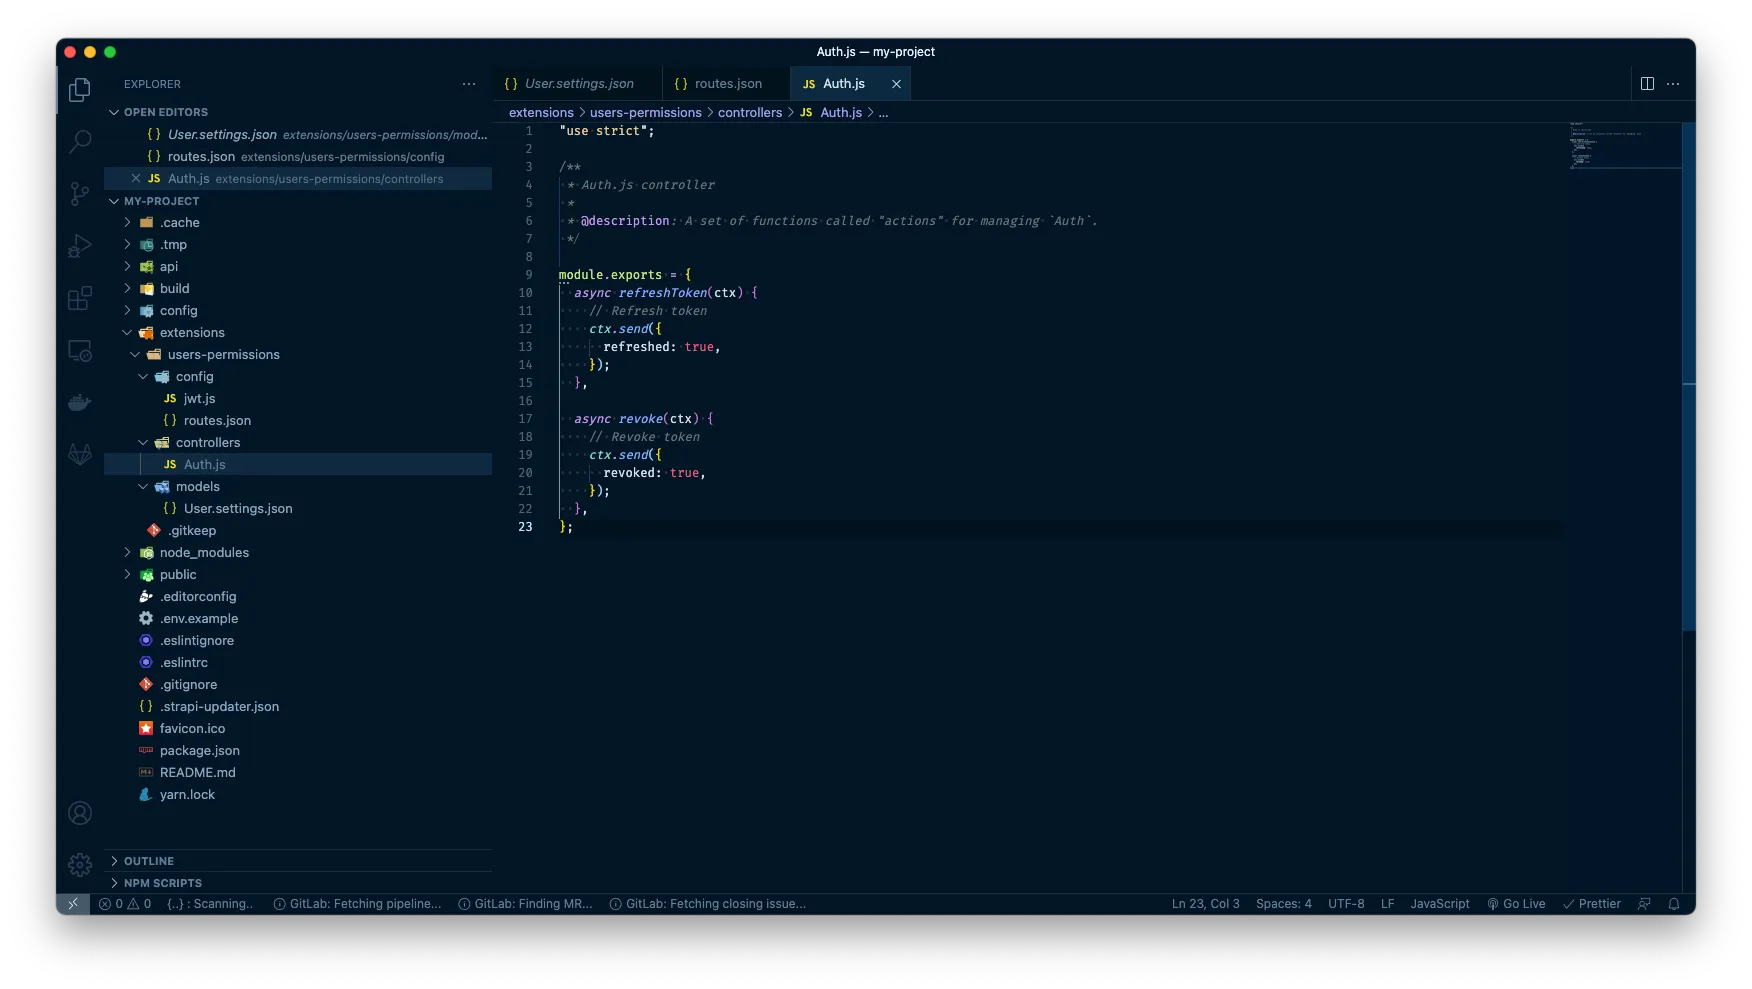
Before you save this file, we want to create a new directory under extensions > users-permissions called “controllers” and in here we will create a new file called Auth.js and add following code:
"use strict";
/**
 * Auth.js controller
 *
 * @description: A set of functions called "actions" for managing `Auth`.
 */
module.exports = {
  async refreshToken(ctx) {
    // Refresh token
    ctx.send({
      refreshed: true,
    });
  },
  async revoke(ctx) {
    // Refresh token
    ctx.send({
      revoked: true,
    });
  },
};
Save both files and check your terminal to verify everything is still working correctly. You may have to restart your Strapi server. The quick eye will catch my little mistake here in creating a routes object referring to a handler in the Auth controller prior to have created these handlers. This would cause Strapi to complain when files are saved as Strapi will automatically restart itself and validate the codebase anew. But once you’ve saved both files, you should be good to run yarn develop once again, and get your server running.
Next up, we want to enter Strapi and expose these two new endpoints for public use. We do that by going in to settings and selecting ‘Roles’ under the ‘Users & permissions plugin’ section and then clicking on ‘Public’.
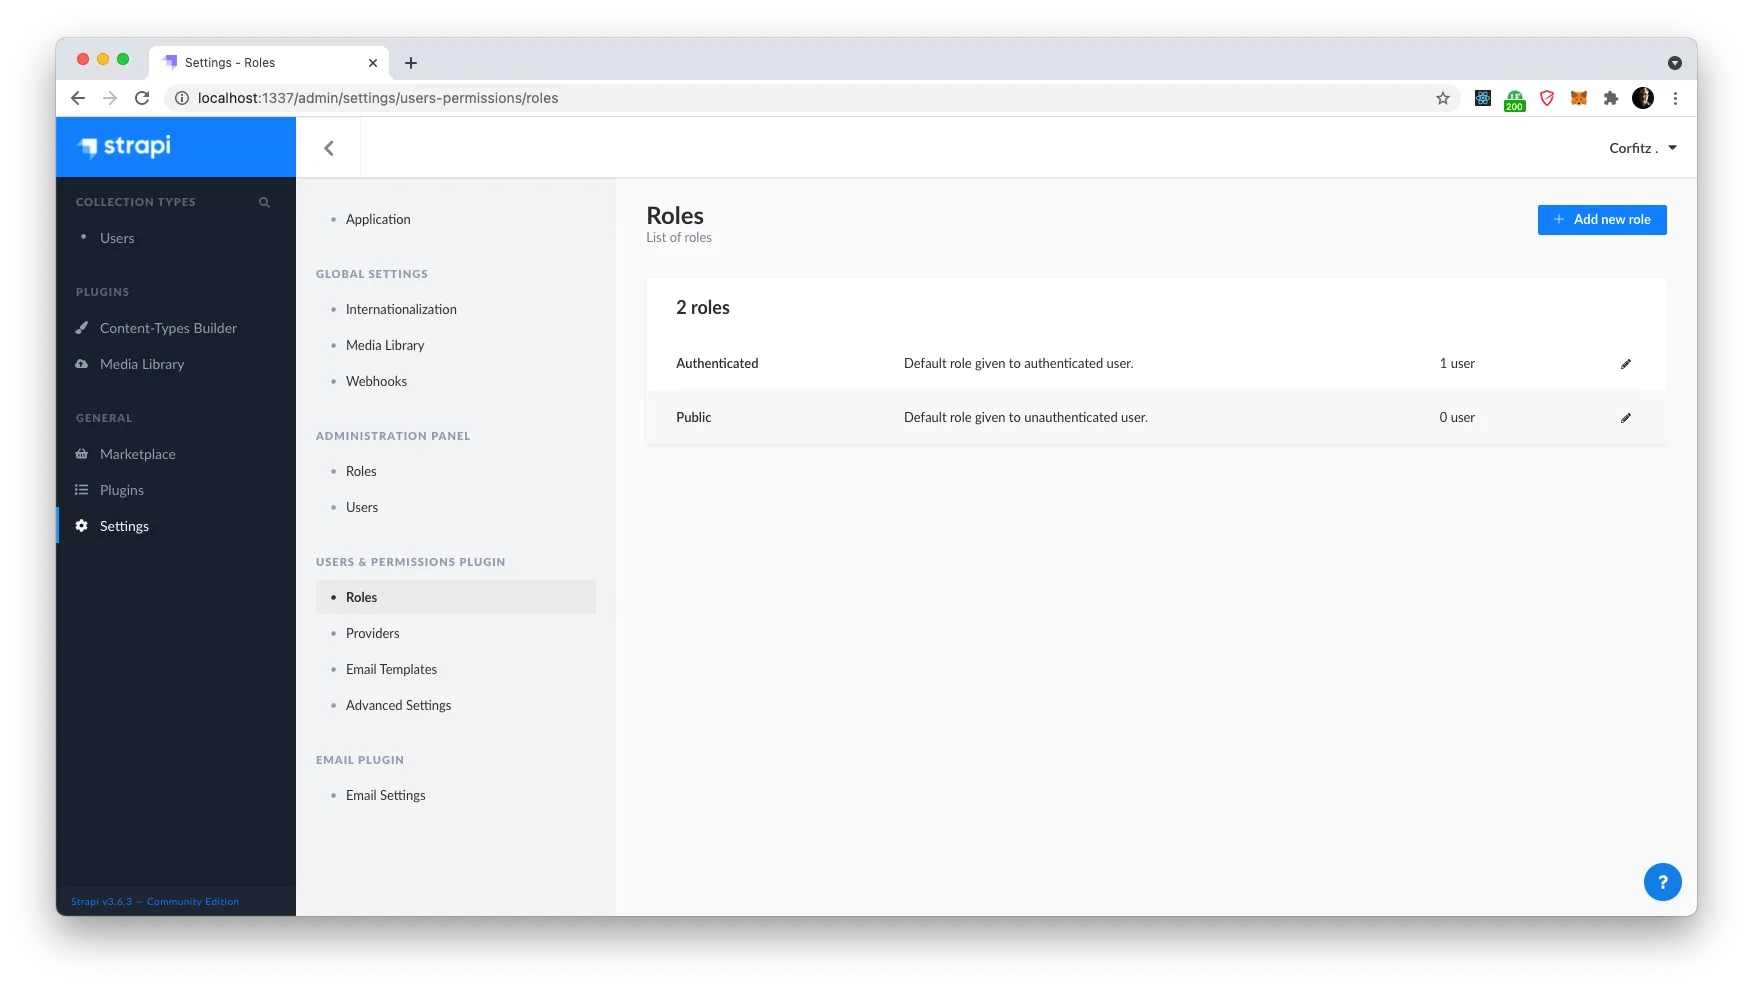
Down at the bottom of the list, you will expand the “users-permissions” accordion and notice our two new endpoints listed under ‘Auth’. Enable both of these and click ‘Save’.

Next — let’s go back to our API client and test our new endpoints. We set up a POST request, add http://localhost:1337/auth/refreshToken as the endpoint. Run it and you should expect a status 200 response with a JSON body containing a property saying: refreshed: true.
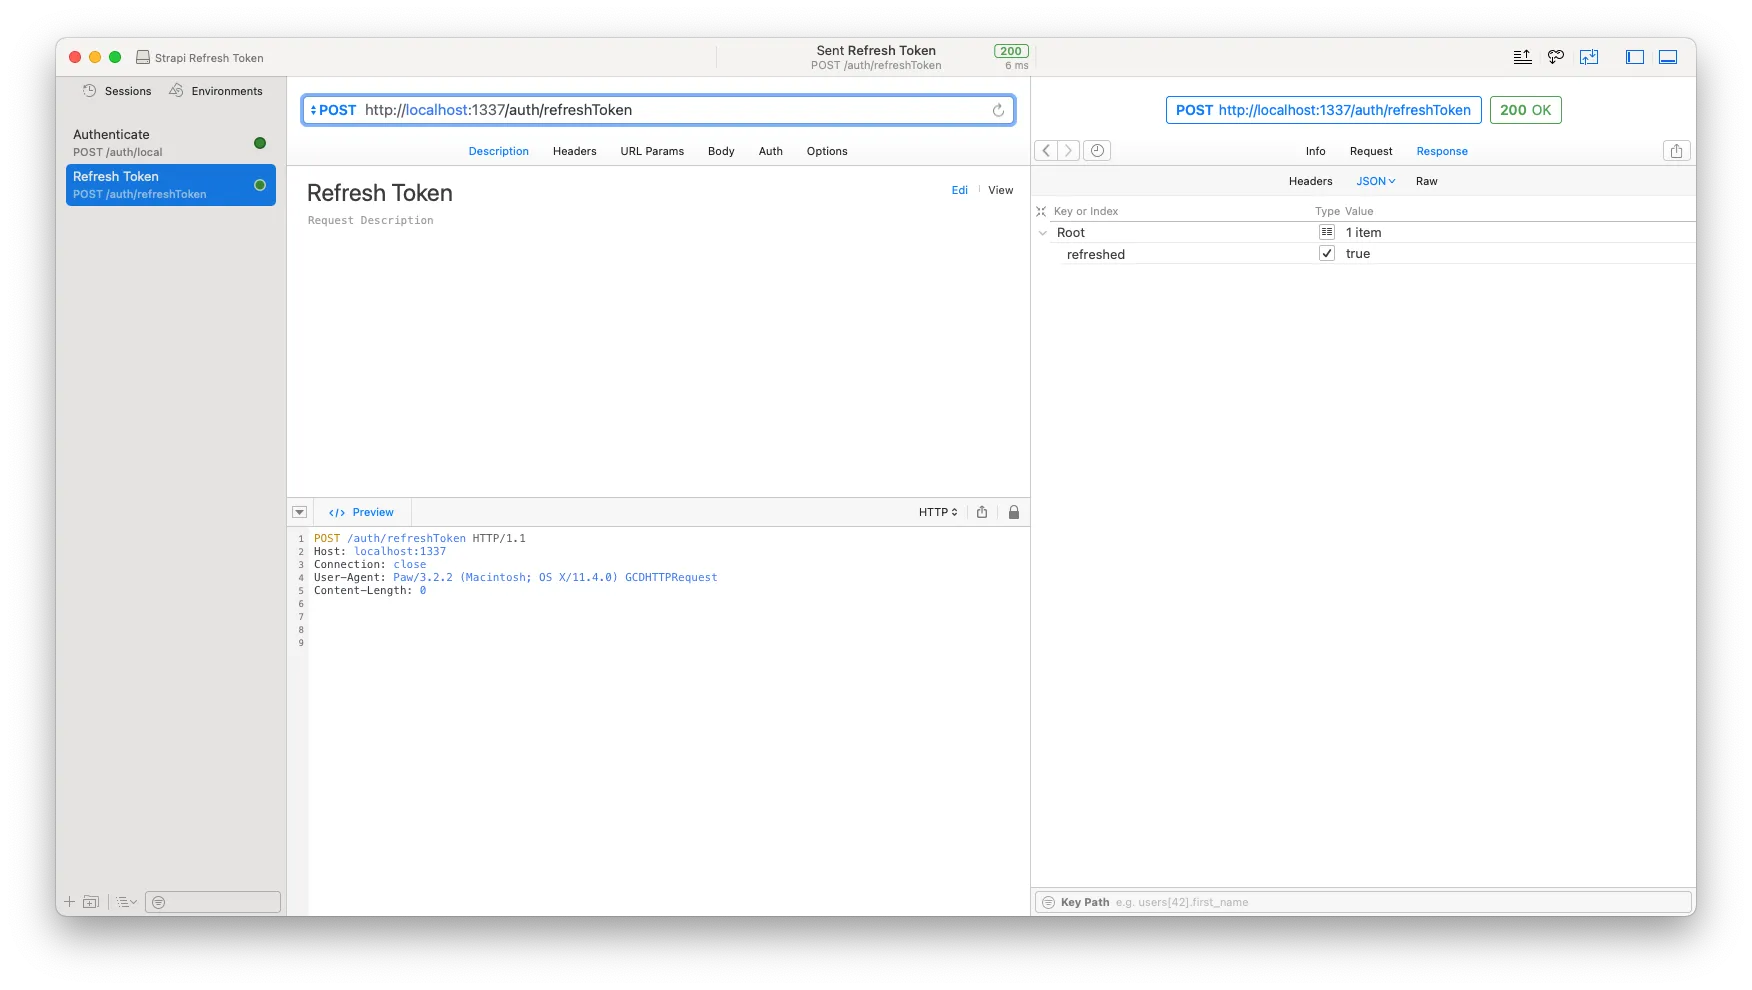
Great job so far! Until now nothing fancy has happened, but everything is working well and we have built the foundation for our custom implementation now. So let’s get started on that.
The Refresh Token
At this point, we are going to extend a little further on Strapi, as we want to inherit the entire ‘Auth.js’ file and extend with some custom return data. We want to extend the return object at authentication with a refresh token as well. Therefor we need to do a little custom coding in this section.
To get started, we will go to the ‘users-permissions’ repository at Strapi and locate the Auth.js file under ‘controllers’.
We want to copy all of its content and paste it in to our own Auth.js file. Note that we can’t have two modules.exports objects in one file, so we will simply copy our two new handlers in to the top of the module.exports object we’ve just pasted in. If you are unsure about how to do this, you can always have a look at the gist here.
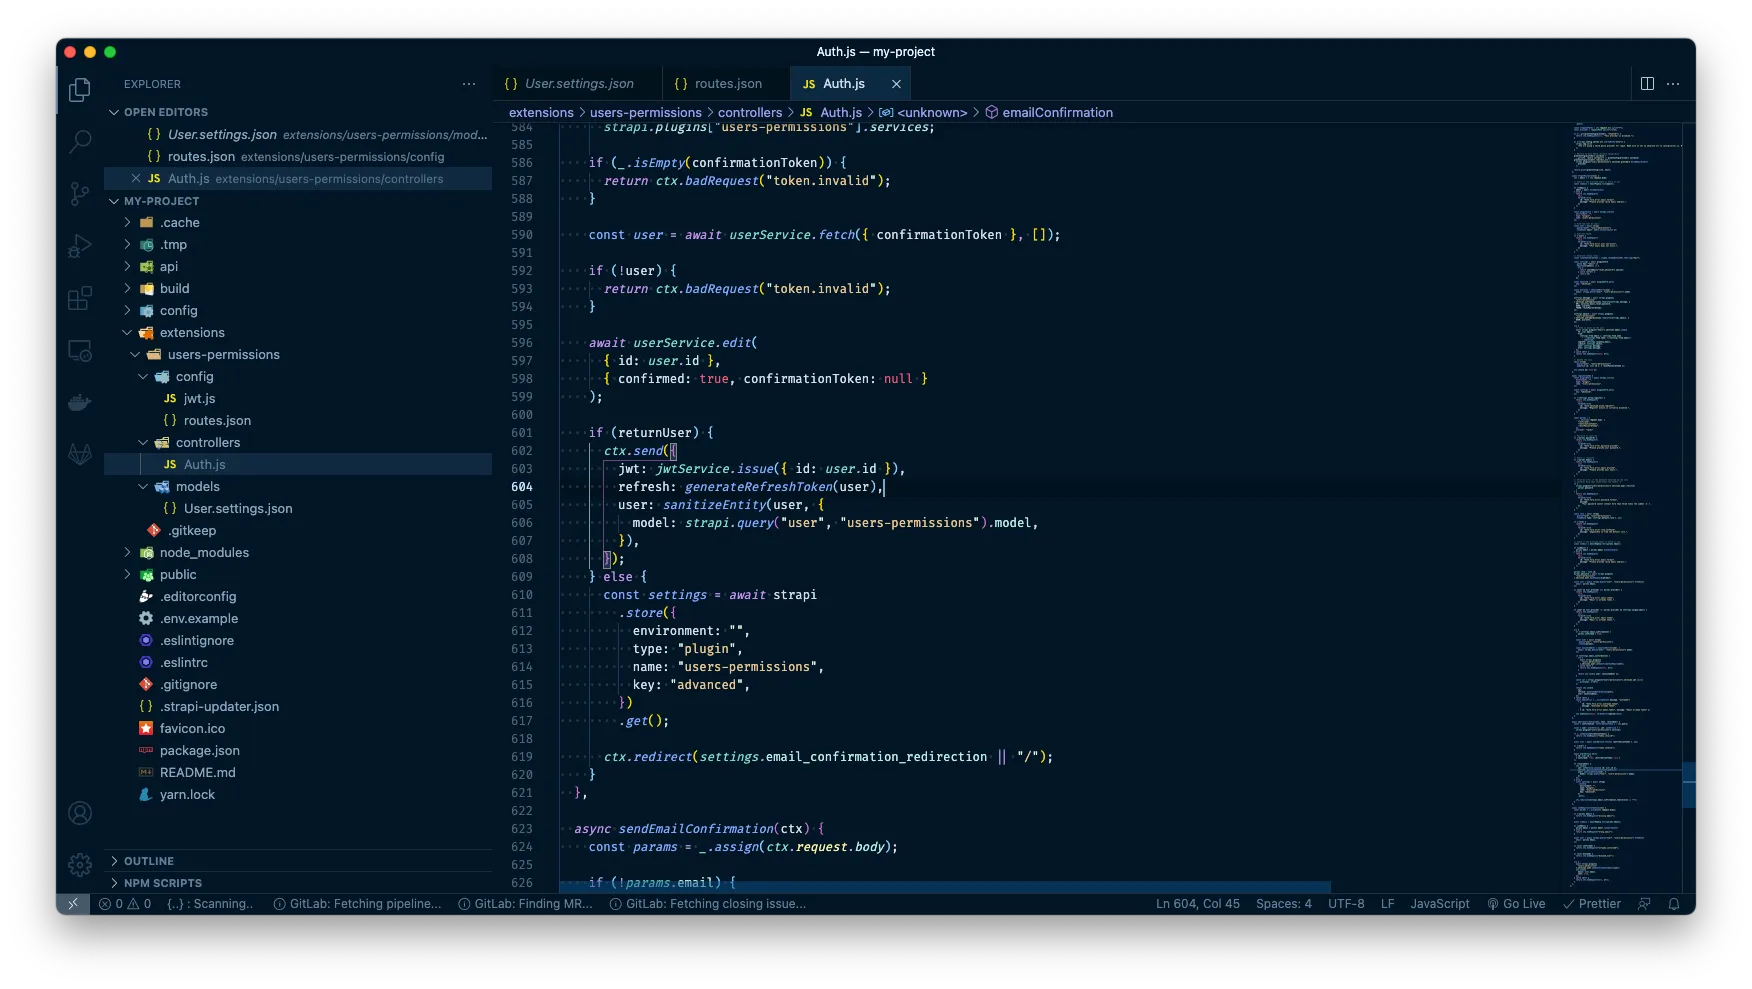
At the top of the file, just above the exported modules object, we add our custom function to generate refresh tokens.
const generateRefreshToken = (user) => {
  return strapi.plugins["users-permissions"].services.jwt.issue(
    {
      tkv: user.tokenVersion, // Token Version
    },
    {
      subject: user.id.toString(),
      expiresIn: "60d",
    },
  );
};
We use the same JWT service that is used by Strapi to issue normal JWT tokens, but instead of the user ID in the payload, we add the token version, and we then add the user ID as the subject of our token in the JWT options object along with a longer expiration date. In this case I have simply doubled the lifetime of a standard token, which should suffice in most cases. There are no real standards of this, as some APIs have refresh tokens living for years while others for months. In our case, 60 days should be just fine.
Next up, we want to find all the places in Auth.js where a JWT token is being issued and extend the object with a refresh property containing the token returned by our new function: refresh: generateRefreshToken(user). (Last time I did this, I found 5 places to add this on lines: 163, 199, 245, 565, 604.)
If we go back to our API client once again and run the authentication call, we should now see, that we also get a refresh token back. Wunderbar!
And to be sure that the refresh token is being created correctly, let’s just verify the contents of its payload at jwt.io again. Now we see that the expiration date is 60 days away and it also includes tkv and sub which are our token version and user id. So that is great!
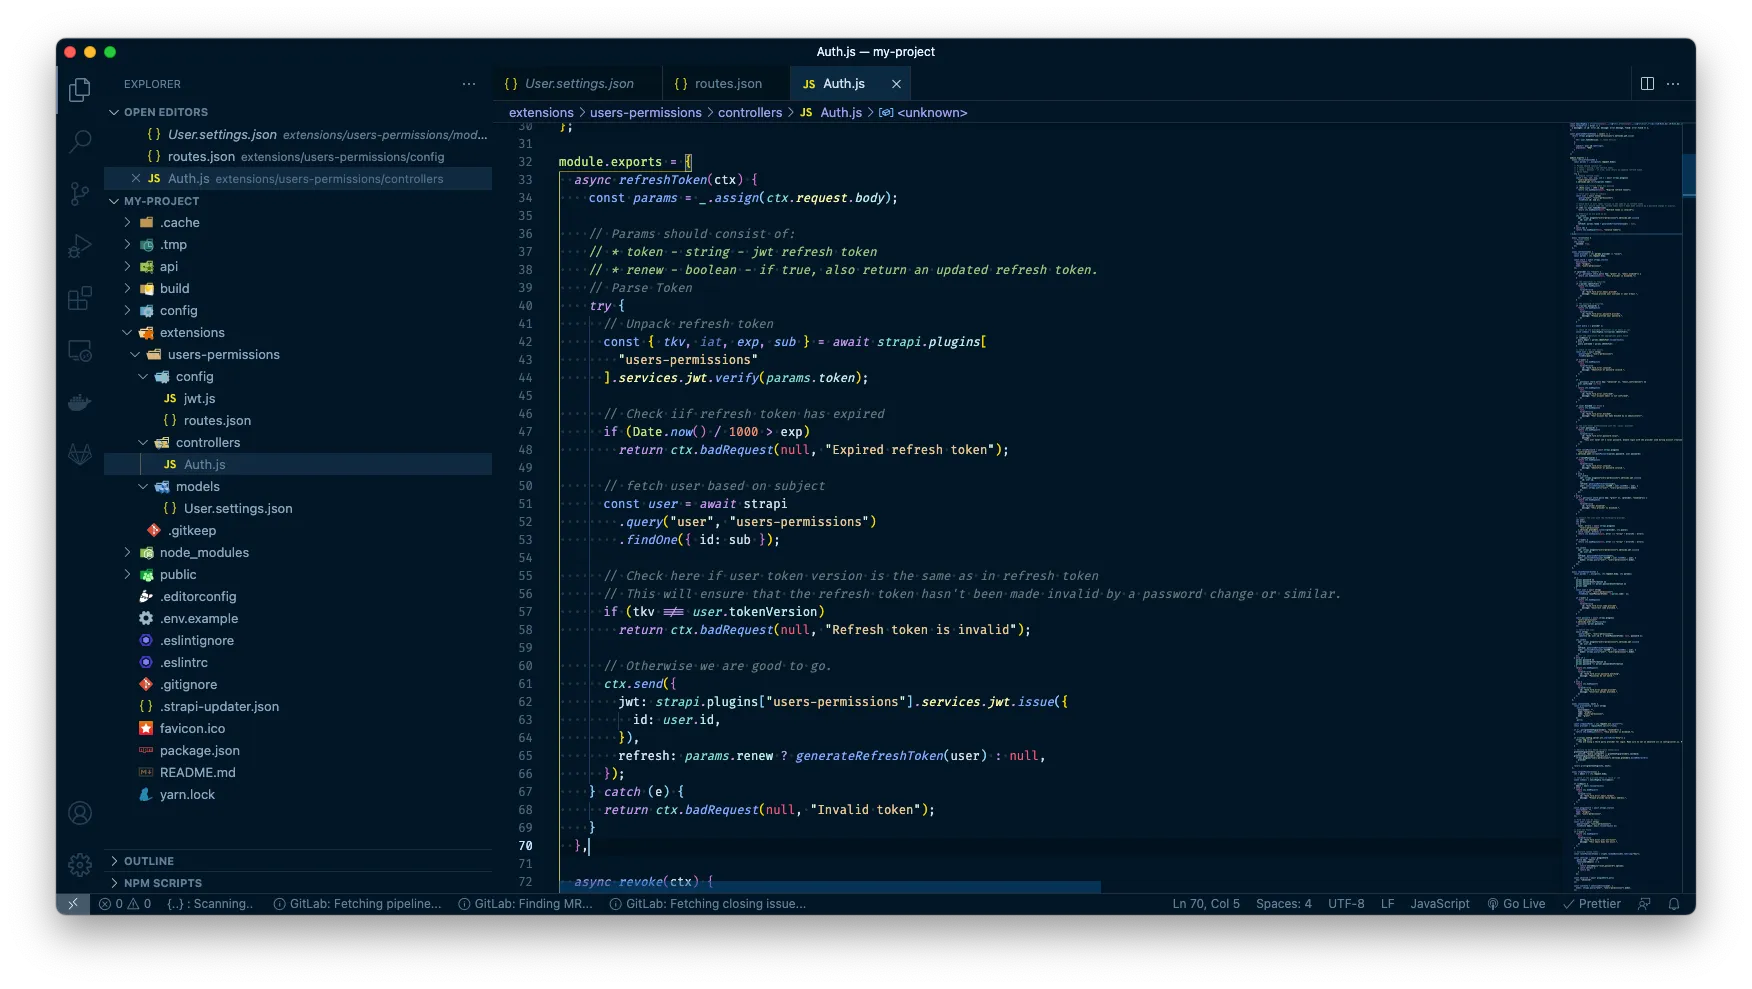
Next up we are going to actually build our refreshToken handler. In short, it will unpack the refresh token and start by verifying it isn’t expired. Hereafter we fetch the user based on the subject property and verify that the token version in the refresh token matches the token version for the user.
This is where we create the higher level of security. If a refresh token has been compromised or stolen, we can then simply increase the token version by 1 for the user, and then the refresh token will no longer be valid. For the extra level of security, we could also extend the resetPassword handler to automatically increase this to invalidate all current refresh tokens and thereby require the user to log in again on all browsers and devices.
If that’s all good, we then create a new jwt token (and refresh token if requested) and return to the caller.
async refreshToken(ctx) {
  const params = _.assign(ctx.request.body);

  // Params should consist of:
  // * token - string - jwt refresh token
  // * renew - boolean - if true, also return an updated refresh token.
  // Parse Token
  try {
    // Unpack refresh token
    const {tkv, iat, exp, sub} = await strapi.plugins["users-permissions"].services.jwt.verify(params.token);
    // Check if refresh token has expired
    if (Date.now() / 1000 > exp) return ctx.badRequest(null, "Expired refresh token");
    // fetch user based on subject
    const user = await strapi.query("user", "users-permissions").findOne({ id: sub });
    // Check here if user token version is the same as in refresh token
    // This will ensure that the refresh token hasn't been made invalid by a password change or similar.
    if (tkv !== user.tokenVersion) return ctx.badRequest(null, "Refresh token is invalid");
    // Otherwise we are good to go.
    ctx.send({
      jwt: strapi.plugins["users-permissions"].services.jwt.issue({
        id: user.id,
      }),
      refresh: params.renew ? generateRefreshToken(user) : null
    });
  } catch (e) {
    return ctx.badRequest(null, "Invalid token");
  }
},
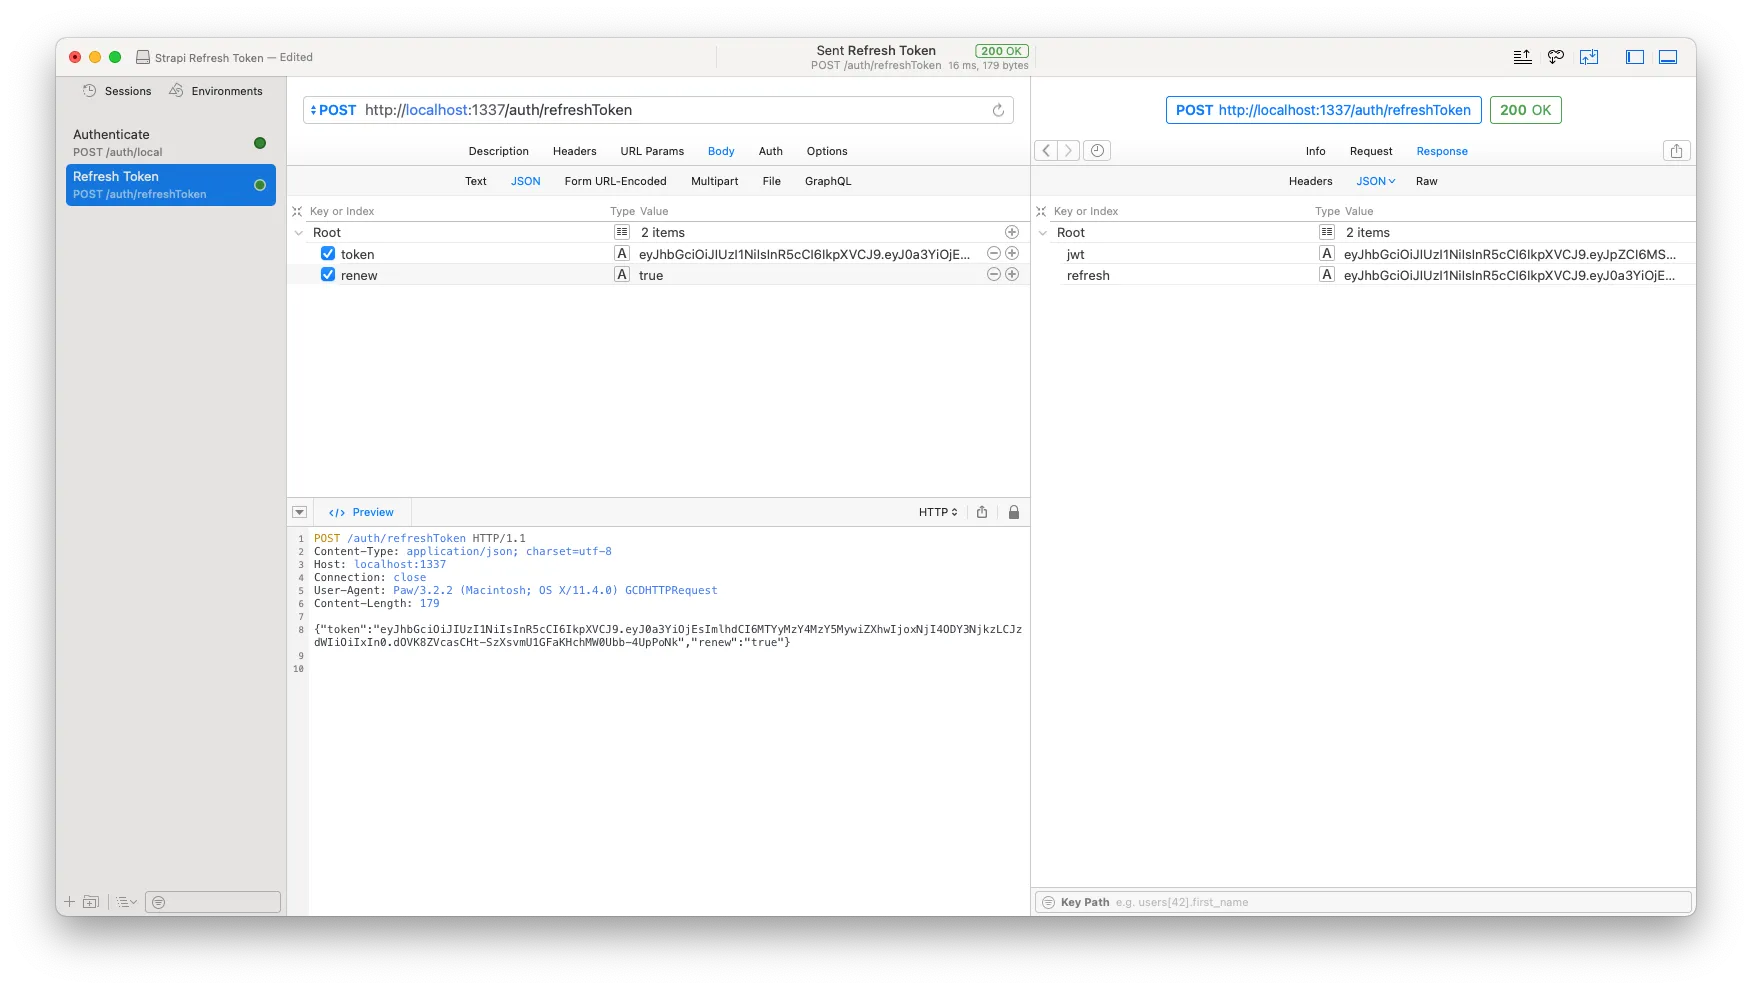
Let’s see if everything works when we call our refresh token endpoint from our API client now. This time we have to make sure we add the ‘token’ property and the optional ‘renew’ property in the JSON body when calling the endpoint. If everything is going according to plan, you should have received a new jwt and possibly refresh token in the callback. 💪
Revoke the token
Now we are going to do almost the same for the revoke handler. The code will be more or less the same with a few changes. Once we have validated the refresh token we then call an update on our user, increasing the token version by 1 and return a simple confirmation to the caller.
async revoke(ctx) {
  const params = _.assign(ctx.request.body);

  // Params should consist of:
  // * token - string - jwt refresh token
  // Parse Token
  try {
    // Unpack refresh token
    const {tkv, iat, exp, sub} = await strapi.plugins["users-permissions"].services.jwt.verify(params.token);
    // Check if refresh token has expired
    if (Date.now() / 1000 > exp) return ctx.badRequest(null, "Expired refresh token");
    // fetch user based on subject
    const user = await strapi.query("user", "users-permissions").findOne({ id: sub });
    // Check here if user token version is the same as in refresh token
    // This will ensure that the refresh token hasn't been made invalid by a password change or similar.
    if (tkv !== user.tokenVersion) return ctx.badRequest(null, "Refresh token is invalid");
    // Update the user.
    await strapi.query("user", "users-permissions").update({ id: sub }, { tokenVersion: user.tokenVersion + 1 });
    // Otherwise we are good to go.
    ctx.send({
      confirmed: true,
    });
  } catch (e) {
    return ctx.badRequest(null, "Invalid token");
  }
},
Let’s test this out by copying the refresh token we used in the test we made towards our refresh token endpoint, and pass it as the token property in a JSON body that we send to a POST request to http://localhost:1337/auth/revoke.
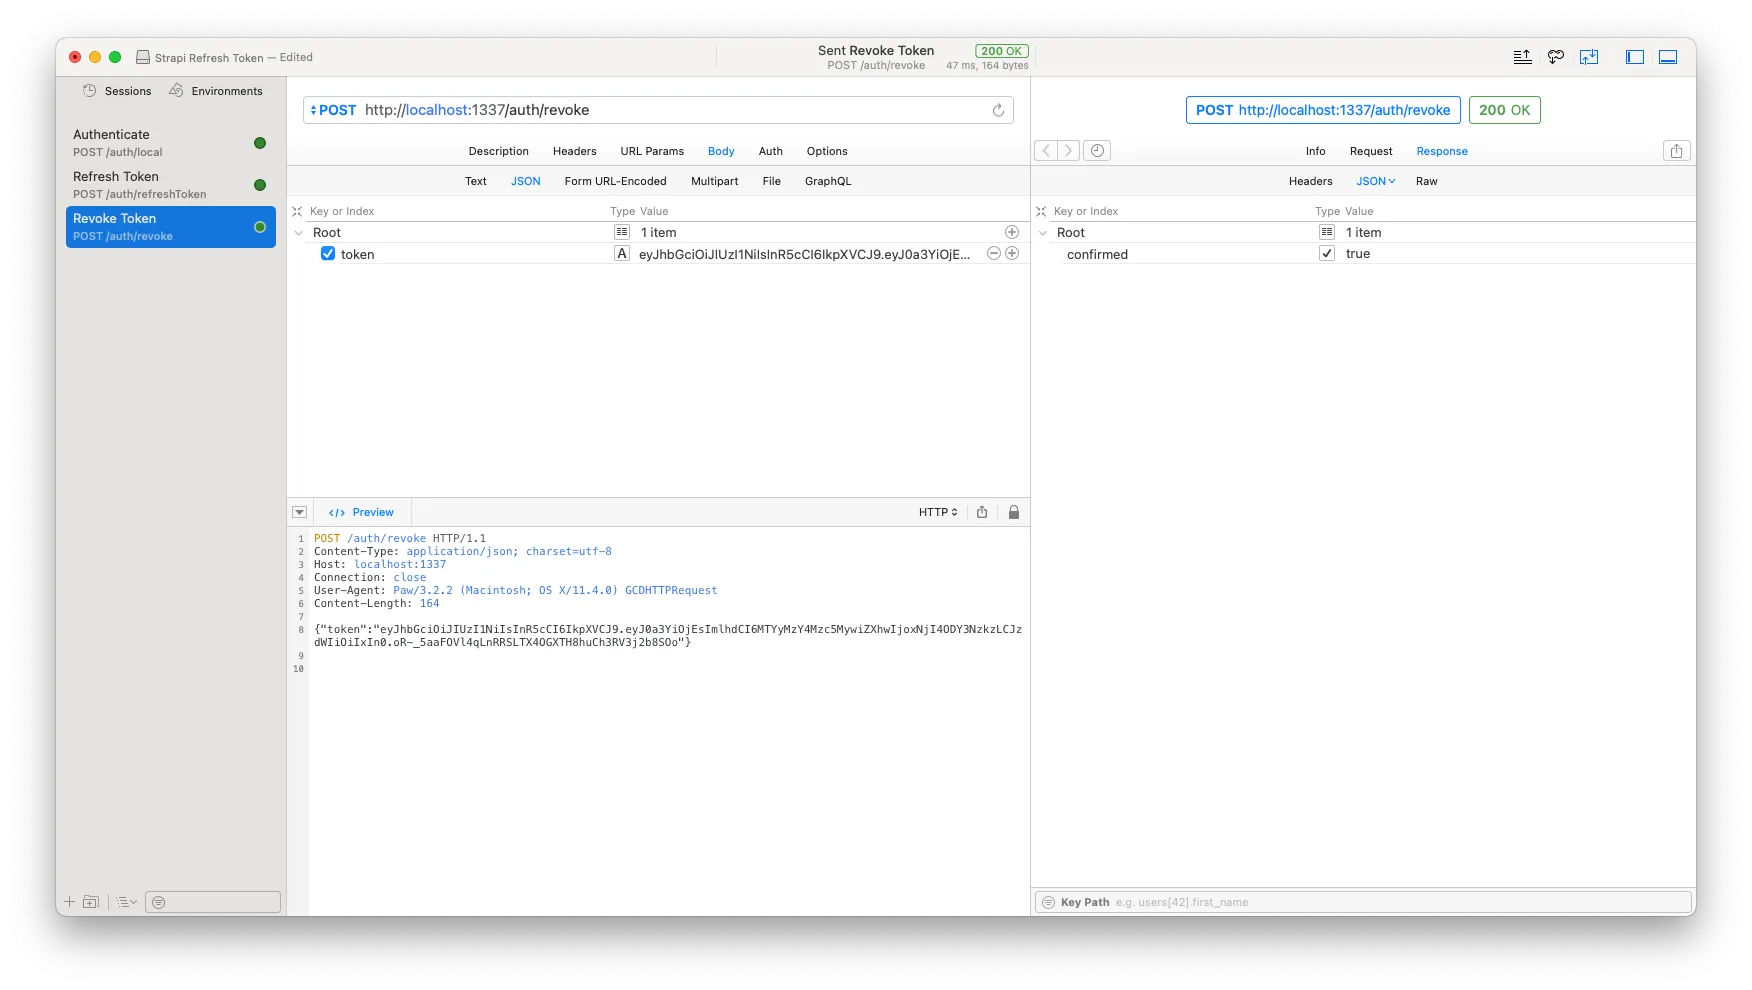
Awesome! We got a confirmation back. Because we are curious creatures, let’s have a look in the Strapi admin and see if the token version for the user has in fact been updated.
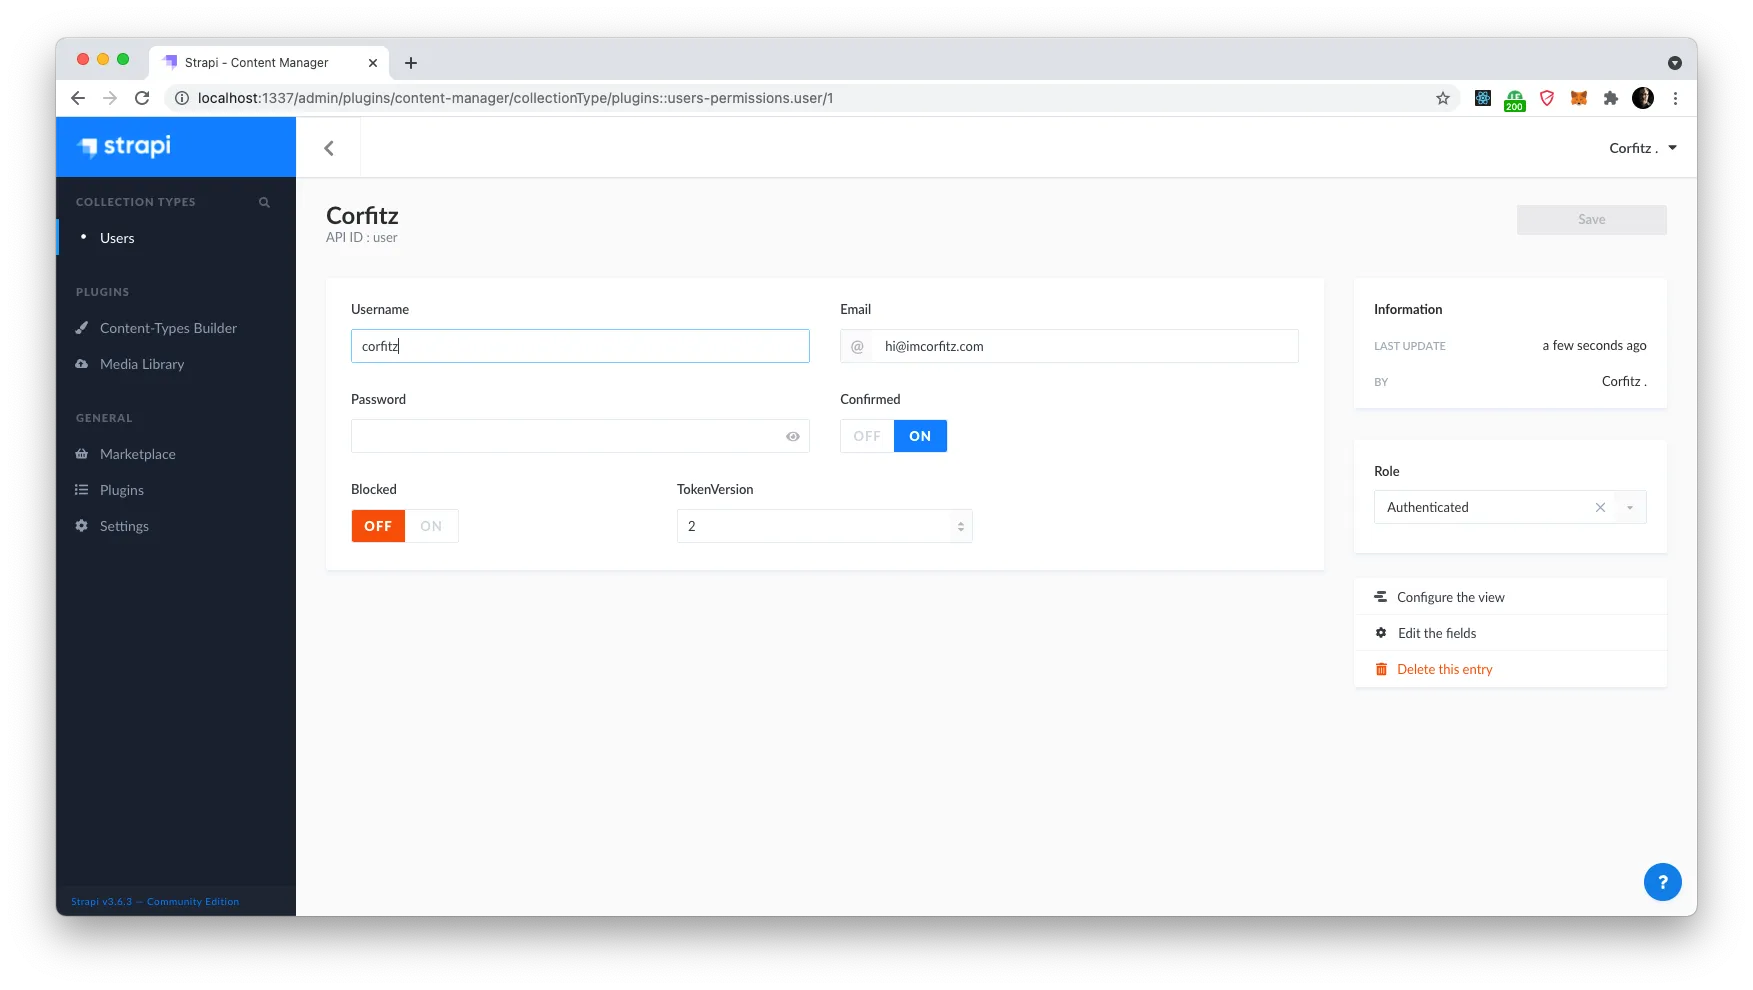
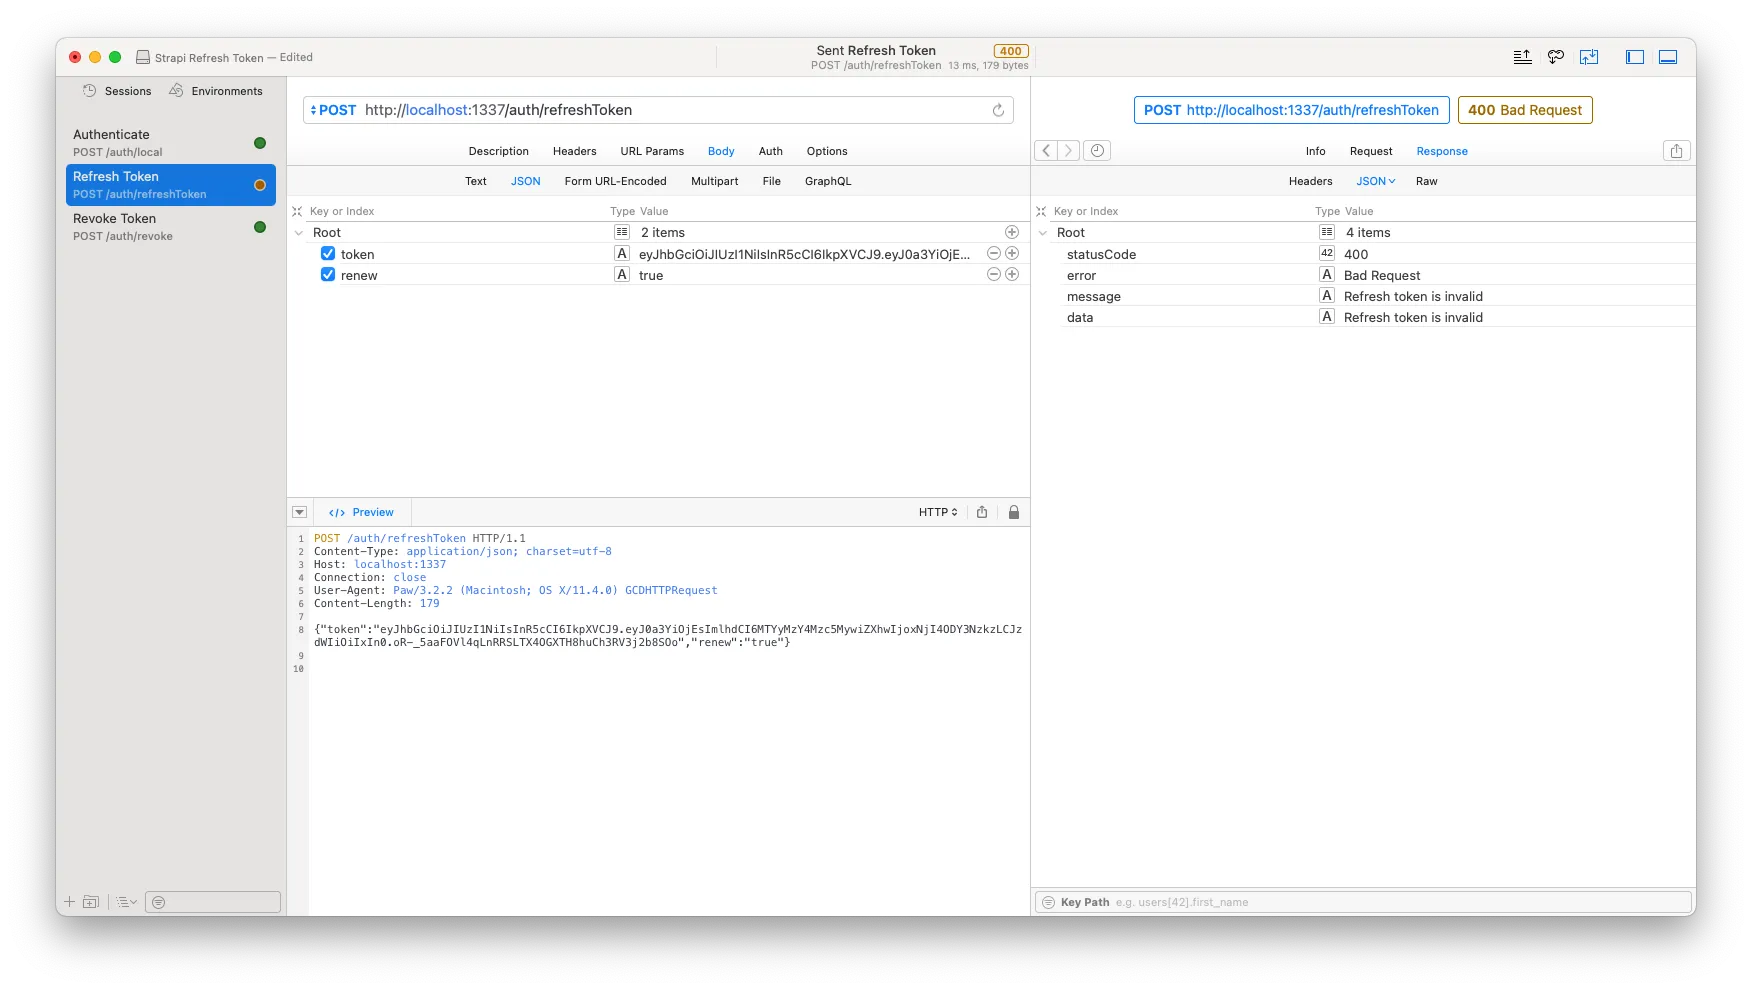
Way to go! The token version now says 2, and now our refresh token should in theory no longer be valid. Let’s open up our API client and trigger the refresh token endpoint call again with the same data as earlier. And would you look at that — Bad request, status 400 with error message: “Refresh token is invalid”. Usually not a status and API reply you are happy to see as a developer, but in this case, it couldn’t be much better.
At this point, we are good to go and can continue the development of our APIs, data structure and new app that we want to build. I wish you all the best and good luck with the work ahead! Cheers!
Corfitz, wait! I am not using REST apis but GraphQL. How can we do the same in GraphQL?
I am glad you asked. As we already have all the logic in place, it is simply a matter of creating the mutations needed, add to the GraphQL API, and use our new handlers to do the work. Let’s set it up.
Now in technicolor GraphQL
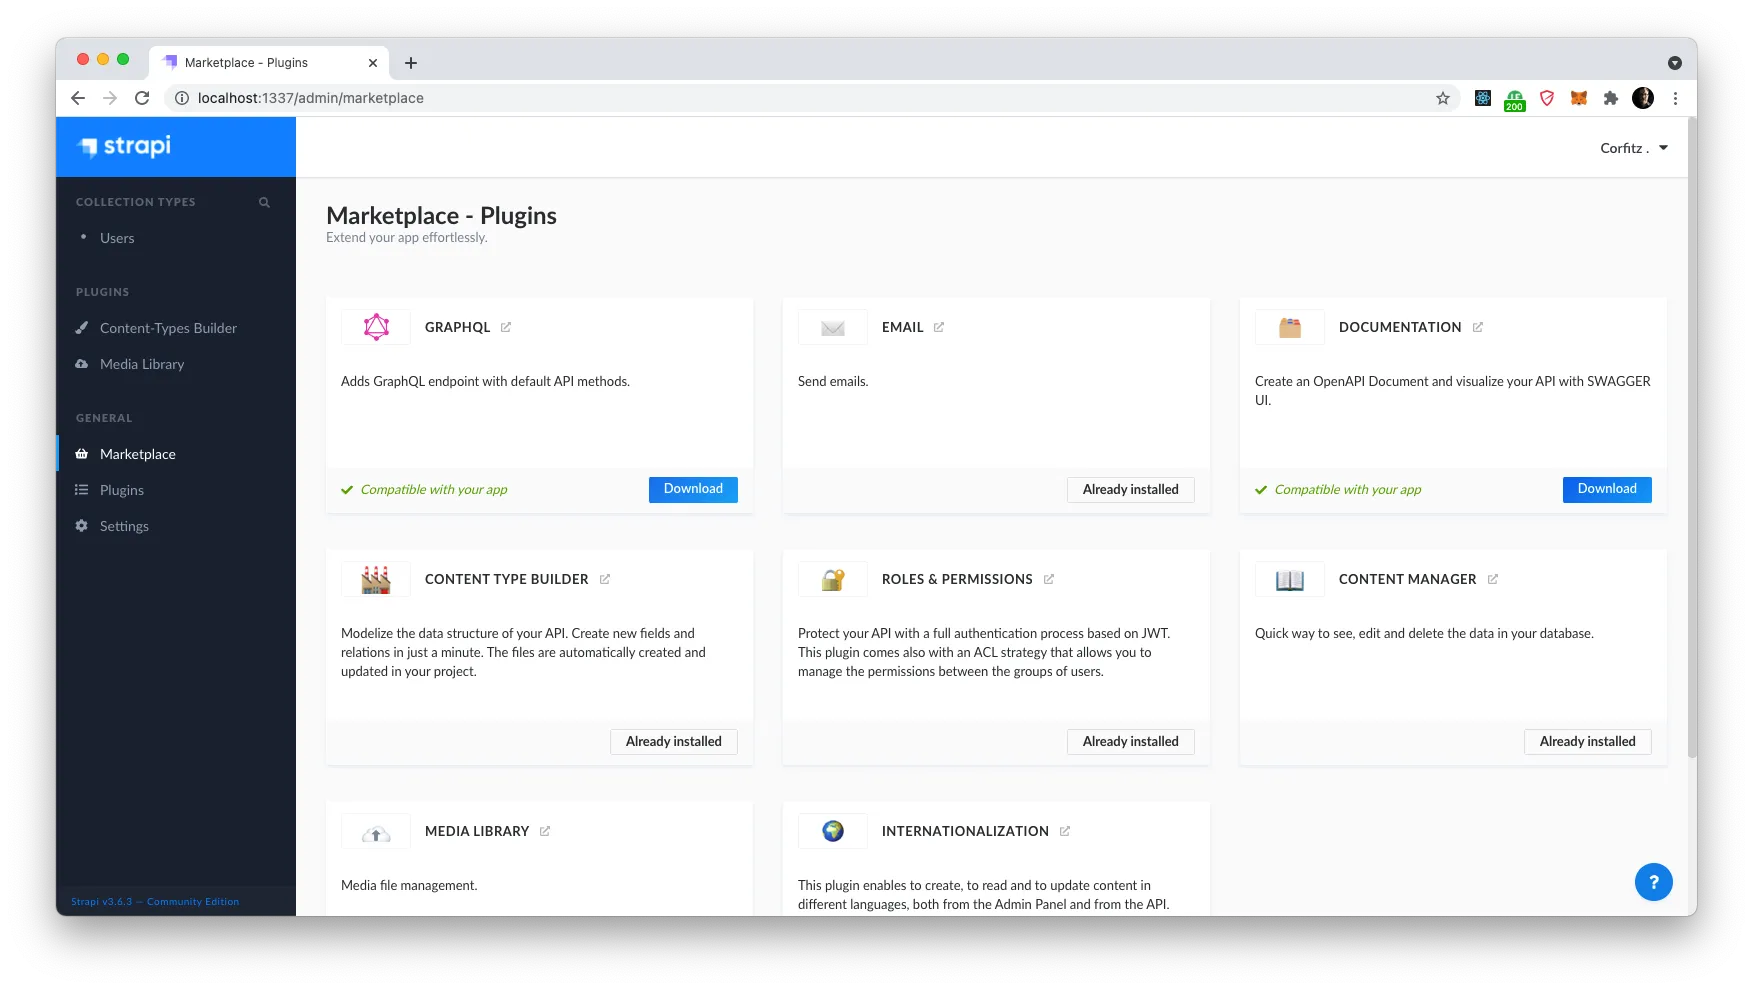
Firstly — if you haven’t already, we need to install the GraphQL extension for Strapi. Go to your Strapi admin, under Marketplace and click the download button for GraphQL. This will run the installation and restart the server. It may take a few seconds to run.
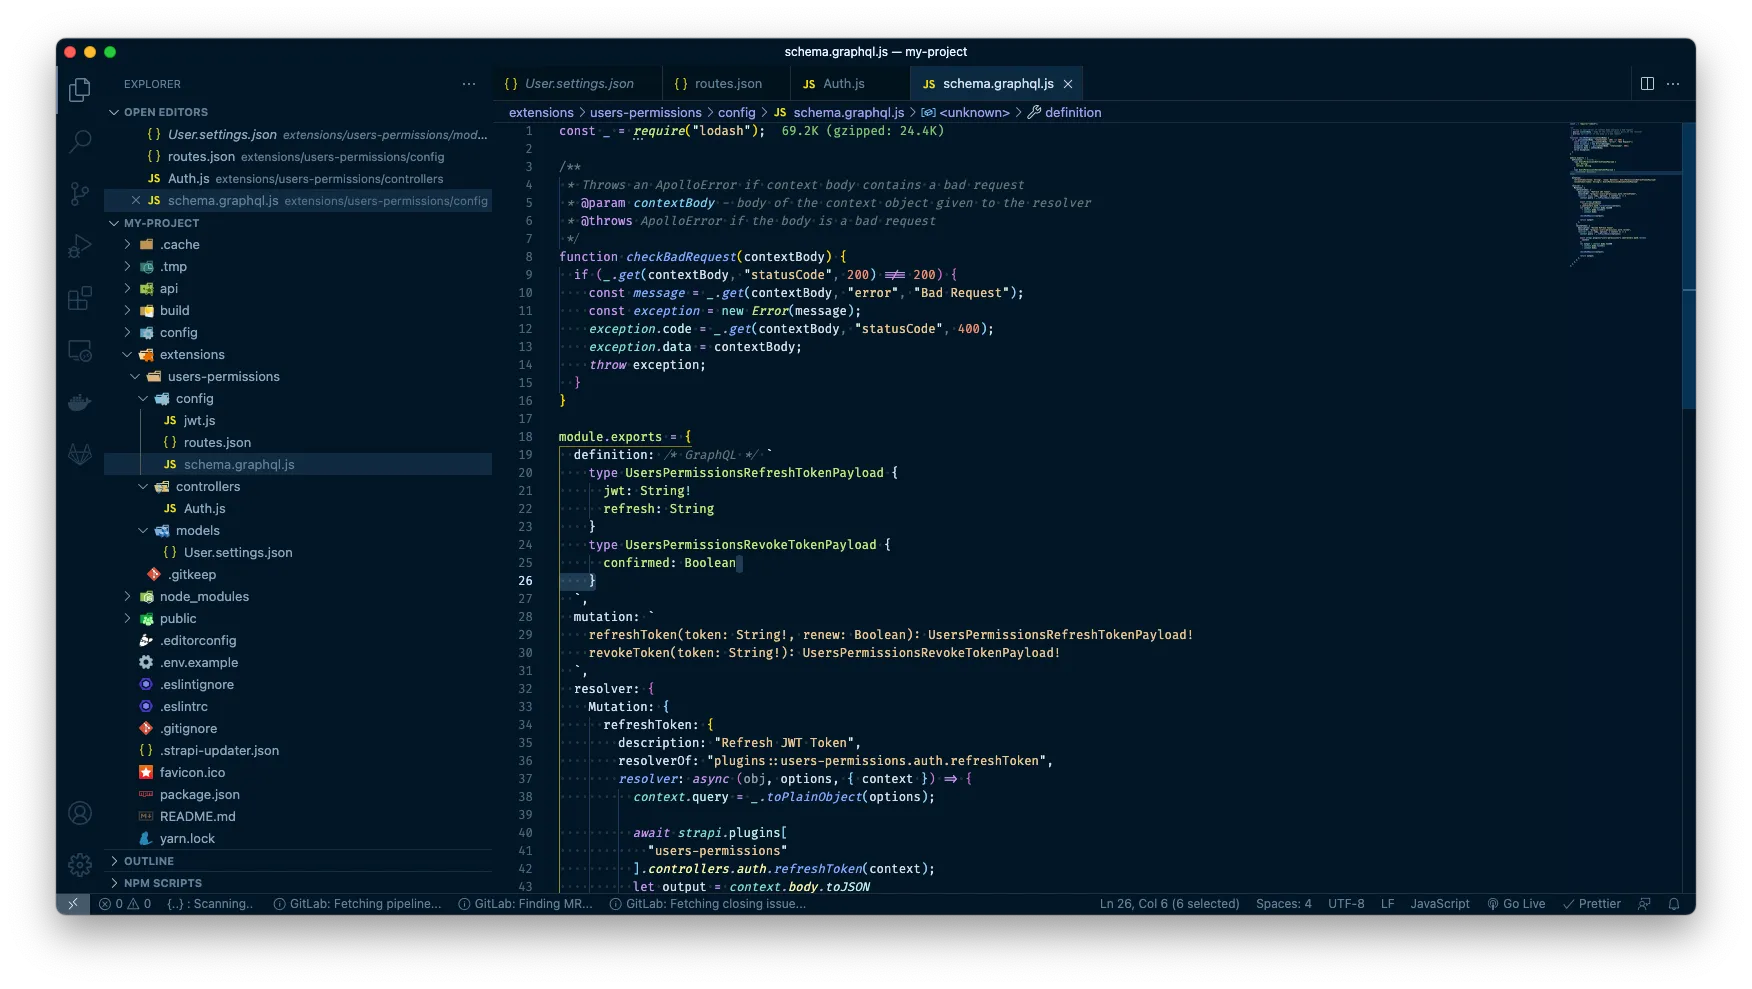
Next up, we are going back to our IDE and let’s create a new file under extensions > users-permissions > config called schema.graphql.js.
We start by requiring ‘lodash’ at the very top:
const _ = require("lodash");Below this we will create a module.exports object consisting of 3 properties:
- Definition | GraphQL TypeDefs
- Mutation | The mutations and their params and return values
- Resolver | The JS code to resolve the mutation calls
The definitions will look like this:
definition: /* GraphQL */ `
  type UsersPermissionsRefreshTokenPayload {
    jwt: String!
    refresh: String
  }
  type UsersPermissionsRevokeTokenPayload {
    confirmed: Boolean
  }
`,
This will be our mutations:
mutation: `
  refreshToken(token: String!, renew: Boolean): UsersPermissionsRefreshTokenPayload!
  revokeToken(token: String!): UsersPermissionsRevokeTokenPayload!
`,
And then we have our resolvers:
resolver: {
  Mutation: {
    refreshToken: {},
    revokeToken: {},
  },
}
Under the refreshToken object, we will add three properties:
- description | string | Description of the mutation
- resolverOf | string | System reference to the handler
- resolver | function | Async function resolving the call
let’s create it like this:
description: "Refresh JWT Token",
resolverOf: "plugins::users-permissions.auth.refreshToken",
resolver: async (obj, options, { context }) => {
  context.query = _.toPlainObject(options);
  await strapi.plugins["users-permissions"].controllers.auth.refreshToken(context);
  let output = context.body.toJSON ? context.body.toJSON() : context.body;
  checkBadRequest(output);
  return output;
},
Wait… checkBadRequest? Where does that come from?
True. We have to create this function as well. So in the top of our file, above our module exports, we will add following function:
/**
 * Throws an ApolloError if context body contains a bad request
 * @param contextBody - body of the context object given to the resolver
 * @throws ApolloError if the body is a bad request
 */
function checkBadRequest(contextBody) {
  if (_.get(contextBody, "statusCode", 200) !== 200) {
    const message = _.get(contextBody, "error", "Bad Request");
    const exception = new Error(message);
    exception.code = _.get(contextBody, "statusCode", 400);
    exception.data = contextBody;
    throw exception;
  }
}
This is just a little error handler, that throws an error with the details from the Auth handler, should the result be a bad request.
Finally, let’s do the same for our revokeToken mutation resolver object:
description: "Revoke Refresh Token",
resolverOf: "plugins::users-permissions.auth.revoke",
resolver: async (obj, options, { context }) => {
  context.query = _.toPlainObject(options);
  await strapi.plugins["users-permissions"].controllers.auth.revoke(context);
  let output = context.body.toJSON ? context.body.toJSON() : context.body;
  checkBadRequest(output);
  return output;
},
And that’s it! If we open up our API client once again and create a GraphQL request, we can then pull the schema data and see that our two new mutation are in fact added to our GraphQL schema. Great stuff. If your API client doesn’t support GraphQL requests, you can also visit http://localhost:1337/graphql which will open the GraphQL playground on your Strapi server.
Let’s test it out! Firstly, we may have to authenticate anew and get a new refresh token, as our previous one is now invalid due to the revoke token call we made earlier.
Then we’ll create a mutation query for refreshToken in our GraphQL client, which takes in the refresh token as ‘token’ parameter, and let’s just pass ‘renew’ as true as well.
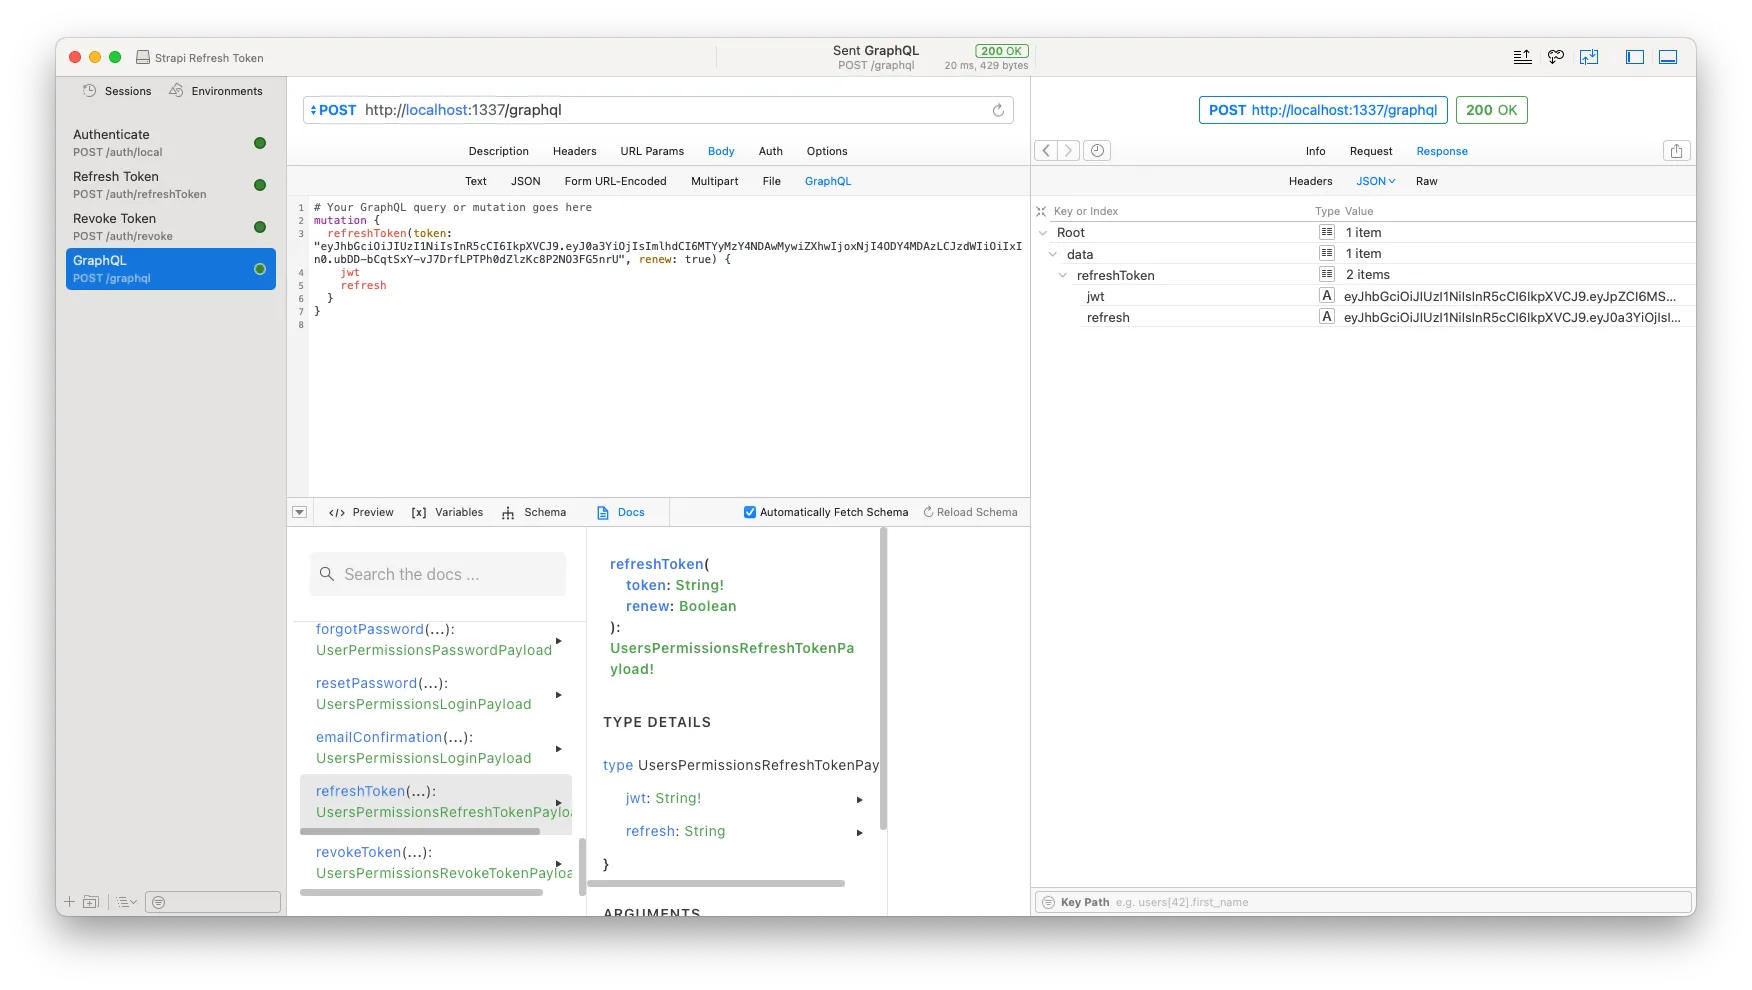
Yis! Starting to seem like a productive day! We got our new jwt token and refresh token back. Now — LET’S REVOKE ‘EM! Muahahaha!!!!
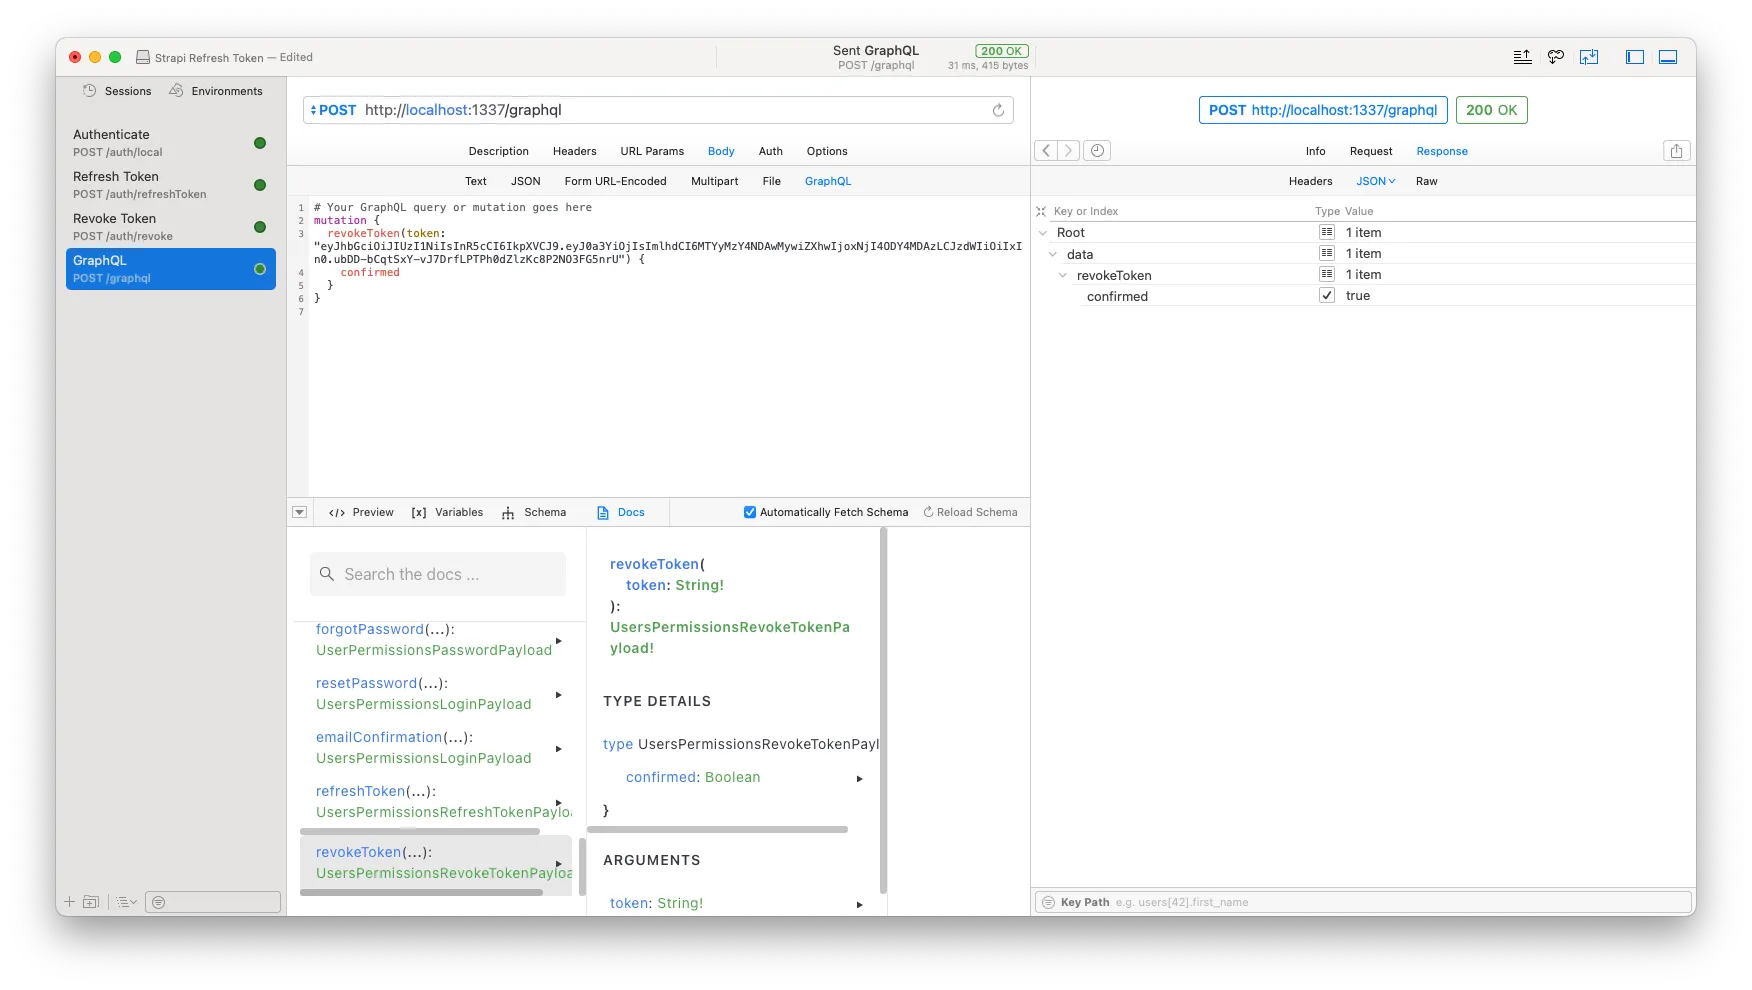
Create another mutation call to the revokeToken mutation with the refresh token, and let’s see what happens. If you are as fortunate as I, you should see a nice data callback with a property of confirmed: true. We are happy.
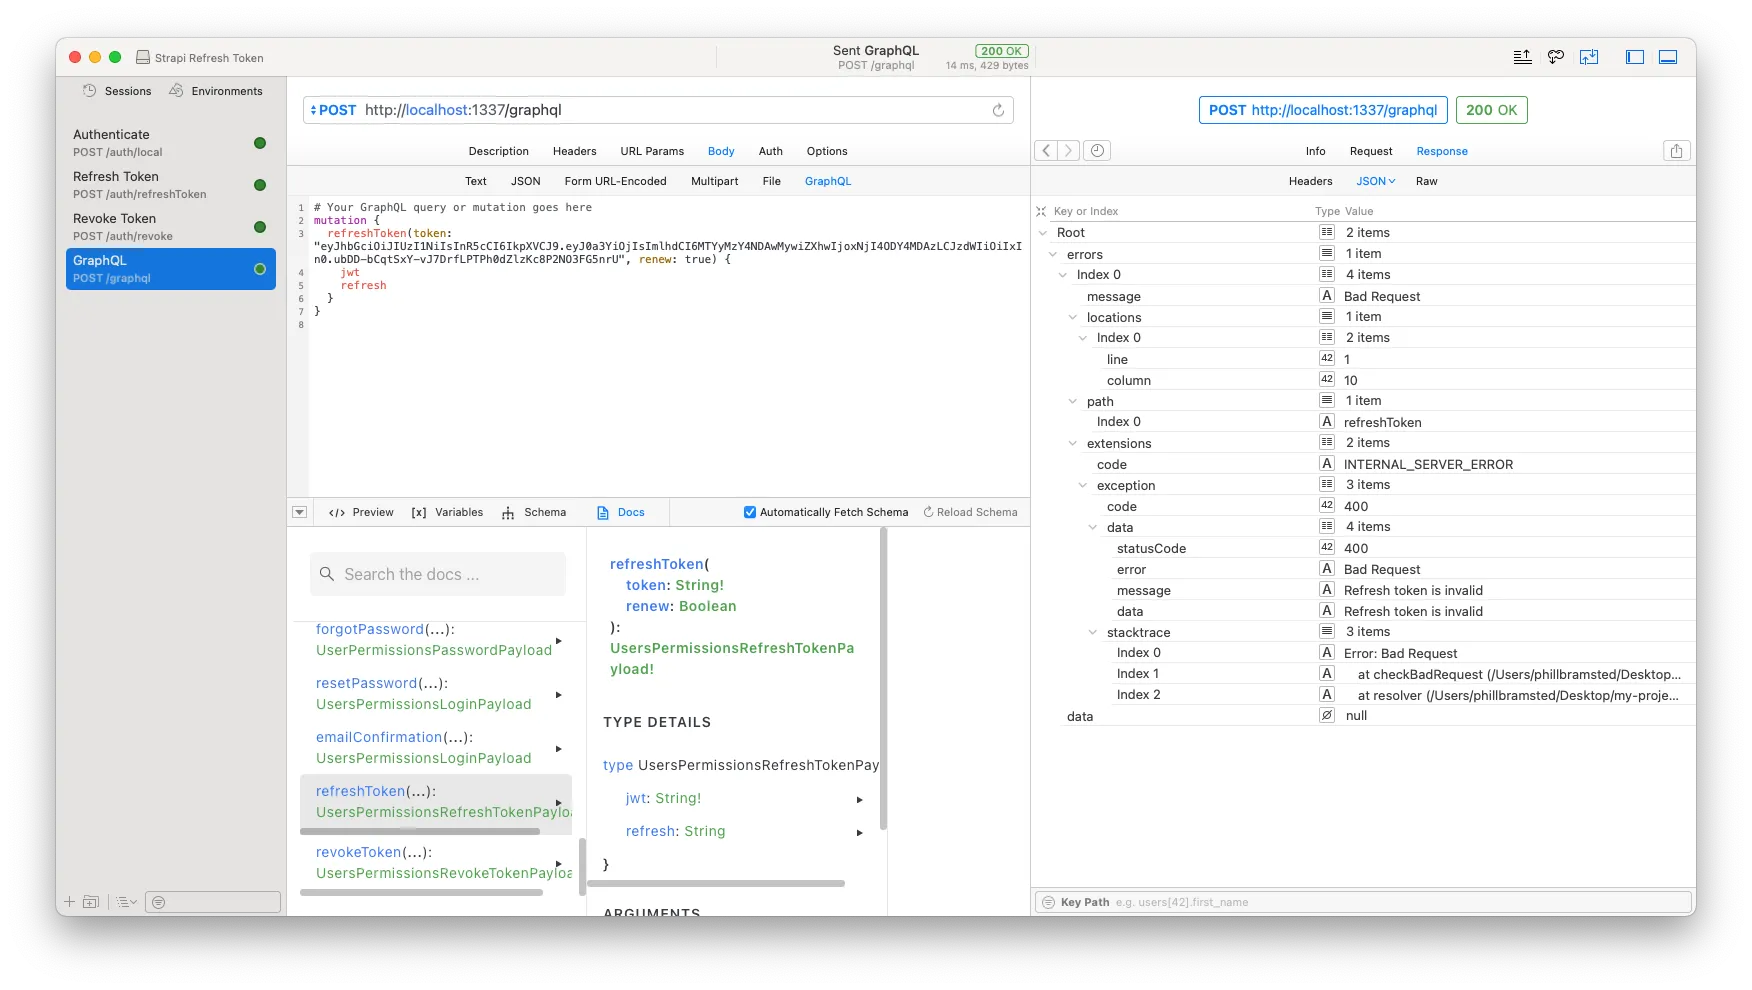
To round it all off, let’s run our refreshToken again to see it the token has in fact been invalidated… And I believe we are done!
Final thoughts
This is a good addition to your Strapi setup whenever you allow for users to engage with your API and data from a front-end or app and want to optimise the UX by keeping their session alive as long as they use your app.
I am surprised this simple implementation isn’t a standard part of the users-permissions extension for Strapi, but with a version 4 just around the corner, they might show us some new and exiting stuff they have worked on. nevertheless, I hope this will be helpful for a few of you.
Have a great one! 🤓 🥃